15 October 2022

This tutorial was written by me on 15 October 2022. Any similarity to other tutorials is not intentional.
Supplies:
Tube - I used a stunning Barbara Jensen tube which you can purchase HERE
Scrapkit - I used a beautiful kit called Answering Him by Wicked Diabla. You can purchase this kit from Wicked Diabla Designs HERE.
Mask - I used Mask_Vivienne_0061, which you can download from Vivienne's Digital Tagging HERE
Filters - Xero Porcelain
Font of choice - Bubble Peanut
Don't forget to leave some love when you download!
Let's start!
Open a new canvas 800 x 800 and floodfill white.
Copy and paste frame element 125.
Click inside your frame with your magic wand, selections, modify, expand by 5. Paste paper 10 as a new layer under the frame layer, selections, invert, delete. Drop shadow the frame layer.
Drop shadwow elements as you go, see my tag for placement
Copy and paste your tube, effects xero porcelain, default settings but change the softness to 12. Duplicate the tube, and on the copy, adjust blur, gaussian blur 3. Change the blend mode to soft light. Drop shadow the original layer.
Copy and paste element 99, re-size 50%
Copy and paste element 109, re-size 50%
Copy and paste element 117, re-size 30%, duplicate and position.
Copy and paste element 116.
Copy and paste element 127.
Copy and paste element 100, re-size 40, duplicate and position.%
Copy and paste element 108, recolour white.
Create a new raster layer above the background layer. Selections, select all, copy and paste paper 2 into selection, select none. Load your mask, merge group. Duplicate, image mirror.
Crop your tag and re-size.
Add your name and your artist's copyright and you're finished!


This tutorial was written by me on 15 October 2022. Any similarity to other tutorials is not intentional.
Supplies:
Tube and Scrapkit - I used a beautiful kit called Pink-O-Ween by Shelley Lynn Designs. This kit includes this awesome tube by Sherri Baldy. Go to Shelley Lynn's blog HERE to find the stores to puchase this kit and tube.
Mask - I used Halloween Mask 4 by Shazzie, which you can download at the Creative Misfits blog HERE
Filters - Xero Porcelain
Font of choice - Alexandra
Don't forget to leave some love when you download!
Let's start!
Open a new canvas 800 x 800 and floodfill white.
Copy and paste frame element 3, re-size75%, drop shadow.
Drop shadwow elements as you go, see my tag for placement
Copy and paste your tube, re-size 65%. Effects xero porcelain, default settings but change the softness to 12. Duplicate the tube, and on the copy, adjust blur, gaussian blur 3. Change the blend mode to soft light. Drop shadow the original layer.
Copy and paste element 41, re-size 50%
Copy and paste element 25, re-size 25%
Copy and paste element 56, re-size x20%.
Copy and paste element 77, re-size 20%
Copy and paste element 29, re-size 80%
Copy and paste element 9, re-size 30%
Copy and paste element 7x, re-size 20%
Create a new raster layer above the background layer. Selections, select all, copy and paste paper 2 into selection, select none. Load your mask, merge group. Lower the opacity to about 44 if you like that look.
Crop your tag and re-size. Add some sparkles!
Add your name and your artist's copyright and you're finished!
New CT Tag for All Dolled Up
This gorgeous kit is called Roxane. It has elements which could be used for Steampunk, Goth or Halloween creations, and it's stunning! You can purchase the kit at Paper Dolls Scrap Store HERE


This gorgeous kit is called Roxane. It has elements which could be used for Steampunk, Goth or Halloween creations, and it's stunning! You can purchase the kit at Paper Dolls Scrap Store HERE
14 October 2022
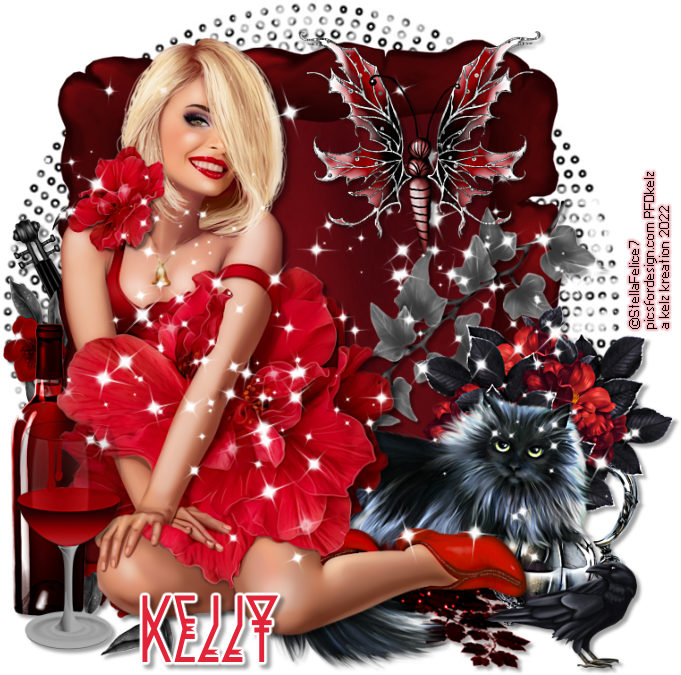
This tutorial was written by me on 14 October 2022. Any similarity to other tutorials is not intentional.
Supplies:
Tube - I used a fab tube by StellaFelice7. You can purchase this tube at Picsfordesign HERE.
Scrapkit - I used a stunning kit by BrokenChell23 You can purchase this kit from Picsfordesign HERE.
Mask - I used Miz Mask 237, which you can download at MizTeeques Masks HERE
Filters - Xero Porcelain
Font of choice - Pride of the Young
Don't forget to leave some love when you download!
Let's start!
Open a new canvas 800 x 800 and floodfill white.
Copy and paste frame element 87.
Click inside your frame with your magic wand, selections, modify, expand by 5. Paste paper 12 as a new layer under the frame layer, selections, invert, delete. Drop shadow the frame layer.
Drop shadwow elements as you go, see my tag for placement
Copy and paste your tube, effects xero porcelain, default settings but change the softness to 12. Duplicate the tube, and on the copy, adjust blur, gaussian blur 3. Change the blend mode to soft light. Drop shadow the original layer.
Copy and paste element 175, re-size 70%
Copy and paste element 139.
Copy and paste element 162, image flip, re-size 60%.
Copy and paste element 160.
Copy and paste element 66, re-size 60%
Copy and paste element 110, re-size 30%
Copy and paste element 153, re-size 60%
Copy and paste element 151, re-size 45%
Copy and paste element 157, re-size 45%
Create a new raster layer above the background layer. Selections, select all, copy and paste paper 10 into selection, select none. Load your mask, merge group.
Crop your tag and re-size. Add some sparkles!
Add your name and your artist's copyright and you're finished!
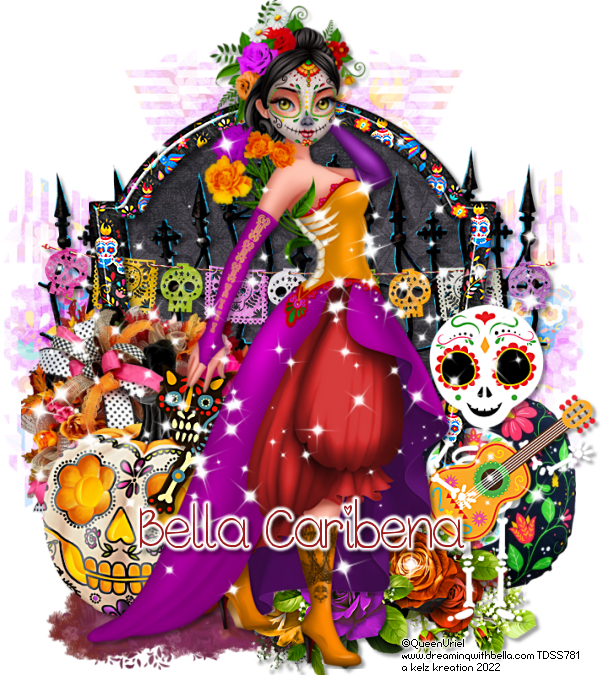
This tutorial was written by me on 14 October 2022. Any similarity to other tutorials is not intentional.
Supplies:
Tube and Scrapkit - I used an awesome kit by Bella Caribena which included the Queen Uriel tube. You can purchase this kit at several stores, go to Bella's blog to find them HERE.
Mask - I used WSL159 by Weescotslass, which you can download HERE
Filters - Xero Porcelain
Font of choice - 2Peas Precious One
Don't forget to leave some love when you download!
Let's start!
Open a new canvas 800 x 800 and floodfill white.
Copy and paste frame element 45.
Click inside your frame with your magic wand, selections, modify, expand by 5. Paste paper 4 as a new layer under the frame layer, selections, invert, delete. Drop shadow the frame layer
Drop shadwow elements as you go, see my tag for placement
Copy and paste your tube, effects xero porcelain, default settings but change the softness to 12. Duplicate the tube, and on the copy, adjust blur, gaussian blur 3. Change the blend mode to soft light. Drop shadow the original layer.
Copy and paste element 73, re-size 45%
Copy and paste element 58
Copy and paste element 65
Copy and paste element 74, re-size 60%
Copy and paste element 67, re-size 45%
Copy and paste element 26, re-size 60%
Copy and paste element 9, re-size 60%
Copy and paste element 4, re-size 45%
Copy and paste element 13, re-size 30%
Create a new raster layer above the background layer. Selections, select all, copy and paste paper 6 into selection, select none. Load your mask, merge group.
Crop your tag and re-size. Add some sparkles!
Add your name and your artist's copyright and you're finished!

13 October 2022

This tutorial was written by me on 13 October 2022. Any similarity to other tutorials is not intentional.
Supplies:
Tube and Scrapkit - I used the gorgeous Steampunk Coffee kit by Magical Moments which includes a stunning Chris Pastel R4R tube. You can purchase this kit from Picsfordesign HERE.
Mask - I used SC_mask038 by sylly creationz, which you can download HERE
Filters - Xero Porcelain
Font of choice - Alex Brush
Don't forget to leave some love when you download!
Let's start!
Open a new canvas 800 x 800 and floodfill white.
Copy and paste frame element 099, re-size 120%.
Click inside your frame with your magic wand, selections, modify, expand by 5. Paste paper 4 as a new layer under the frame layer, selections, invert, delete. Paste your close up tube, delete, select none. Effects xero porcelain, default settings but change the softness to 12. Duplicate the tube, and on the copy, adjust blur, gaussian blur 3. Change the blend mode to soft light. Drop shadow the original layer and change the blend mode to Luminance.
Drop shadow the frame layer.
Drop shadwow elements as you go, see my tag for placement
Copy and paste your tube, effects xero porcelain, default settings but change the softness to 12. Duplicate the tube, and on the copy, adjust blur, gaussian blur 3. Change the blend mode to soft light. Drop shadow the original layer.
Copy and paste element 88, re-size 45%
Copy and paste element 76, re-size 30%
Copy and paste element 59, re-size 30%.
Copy and paste element 94, re-size 20%
Copy and paste element 98, re-size 25%
Copy and paste element 75, re-size 35%
Copy and paste element 28, re-size 20%
Create a new raster layer above the background layer. Selections, select all, copy and paste paper 2 into selection, select none. Load your mask, merge group. Lower the opacity to about 54.
Crop your tag and re-size. Add some sparkles!
Add your name and your artist's copyright and you're finished!
I made some Autumn and BCA Masks. Be gentle, I haven't made many masks!!!. You can download them at the Creative Misfits blog HERE


This tutorial was written by me on 13 October 2022. Any similarity to other tutorials is not intentional.
Supplies:
Tube of choice - I used a stunning tube by Barbara Jensen which you can purchase HERE.
Scrapkit - I used a gorgeous kit by Wicked Diabla called Fight Like a Girl. You can purchase this kit HERE
Mask - I used Trese Mask 0015 which you can download HERE
Filters - Xero Porcelain
Font of choice - White Star
Don't forget to leave some love when you download!
Let's start!
Open a new canvas 800 x 800 and floodfill white.
Copy and paste frame element 79.
Using your selection tool, select inside your frame, paste paper 4 as a new layer under the frame layer, selections, invert, delete, select none. Drop shadow the frame layer.
Drop shadwow elements as you go, see my tag for placement
Copy and paste your tube, effects xero porcelain, default settings but change the softness to 12. Duplicate the tube, and on the copy, adjust blur, gaussian blur 3. Change the blend mode to soft light. Drop shadow the original layer.
Copy and paste wordart element 86, re-size 50%
Copy and paste element 1, use your selection tool to highlight the BCA symbol, copy and paste as a new layer.
Copy and paste element 41, re-size 60%, don't drop shadow.
Copy and paste element 38, image mirror
Copy and paste element 72, re-size 35%
Copy and paste element 103, re-size 70%
Create a new raster layer above the background layer. Selections, select all, copy and paste paper 5 into selection, select none. Load your mask, merge group, re-size 90%.
Crop your tag and re-size. Add some sparkles!
Add your name and your artist's copyright and you're finished!
Subscribe to:
Posts
(Atom)
Snag My Blinkie

Forum I'm At!!

Blogs I Like


