::Search This Blog::
::Blog Archive::
-
►
2024
(1)
- ► 04/28 - 05/05 (1)
-
►
2022
(40)
- ► 12/04 - 12/11 (1)
- ► 11/20 - 11/27 (2)
- ► 11/13 - 11/20 (3)
- ► 11/06 - 11/13 (5)
- ► 10/30 - 11/06 (5)
- ► 10/23 - 10/30 (2)
- ► 10/16 - 10/23 (2)
- ► 10/09 - 10/16 (10)
- ► 10/02 - 10/09 (5)
- ► 09/25 - 10/02 (4)
- ► 09/18 - 09/25 (1)
-
►
2013
(4)
- ► 06/02 - 06/09 (2)
- ► 05/19 - 05/26 (2)
-
►
2012
(38)
- ► 11/18 - 11/25 (2)
- ► 09/30 - 10/07 (4)
- ► 09/23 - 09/30 (12)
- ► 09/16 - 09/23 (8)
- ► 09/09 - 09/16 (1)
- ► 09/02 - 09/09 (3)
- ► 08/19 - 08/26 (1)
- ► 07/15 - 07/22 (1)
- ► 06/03 - 06/10 (1)
- ► 04/22 - 04/29 (2)
- ► 01/29 - 02/05 (1)
- ► 01/22 - 01/29 (2)
-
►
2011
(9)
- ► 11/13 - 11/20 (1)
- ► 07/03 - 07/10 (1)
- ► 06/26 - 07/03 (1)
- ► 06/19 - 06/26 (1)
- ► 06/12 - 06/19 (3)
- ► 05/29 - 06/05 (2)
-
▼
2010
(21)
- ► 12/26 - 01/02 (3)
- ► 12/12 - 12/19 (1)
- ► 11/28 - 12/05 (1)
- ► 11/14 - 11/21 (2)
- ► 10/10 - 10/17 (1)
- ► 09/12 - 09/19 (1)
- ► 08/22 - 08/29 (1)
- ► 08/15 - 08/22 (3)
- ► 06/27 - 07/04 (6)
-
►
2009
(1)
- ► 08/09 - 08/16 (1)
::Contributors::
- Kelly
- Hello and welcome to my blog! I have rejoined the psp community after a few years away. I am planning to update my blog and make it more current! Please check back and I hope you'll find something you like!
::Forum I'm At!!::

::Followers::
Saturday, August 7, 2010
7:05 PM | Edit Post
This tutorial was written by me on 7 August 2010. Any similarity to other tutorials is not intentional.
Supplies:
Tube of choice. I used the awesome art of Ismael Rac. If you want to use his art you must purchase your own tube HERE
Filters : Filter Factory C, Eye Candy 4000 Font : I used Shark Random Funnyness Let's start! Open a new canvas 600 x 250. Effects Filter Factory C, Interference with these settings:
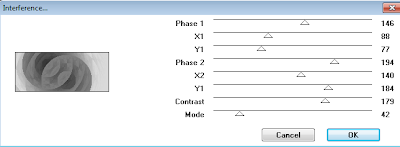
Colourise to suit your tube.
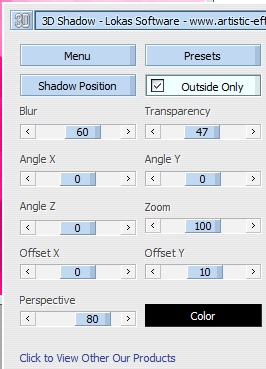
Copy and paste your tube, position to the left, drop shadow. I use Lokas 3d shadow:
Copy and paste your close up & position to the right. Drop shadow & duplicate. On the original, effects texture effects mosaic antique. Lower the opacity of both close ups to get the desired effect. Mine is 30 for the textured layer & 60 for the tube.
Add a new raster layer & fill with a bold colour to match your tag. Selections, select all, selections modify contract by 5, delete. Selections, invert. Selections, modify, contract by 2, delete. Select none. Effects, distortion, Lens distortion. Select the black bits at the top, bottom and sides with your magic wand & press delete on all layers.
Make sure your border (top) layer is active. Effects, Eye Candy 4000 Glass with these settings:
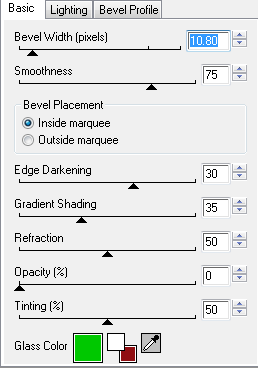
The green colour is the default for this filter. You could change the colour if you want, I just left it & it didn't spoil the effect!!
Add your name & copyright info. You could add some flowers or other elements if you like. I added a doodle behind the tube layers. Be careful not to have the doodle poking your tube in the nose! To make sure this doesn't happen, just make sure the tube layer is active, and selections, select all, float defloat and hit delete on your doodle layer. Make sure none of the doodle is on the outside of the border - unless you like it that way!
To make your avatar, open a new canvas 150 x 150, On your main tag, close the credit layer and your name layer, copy merged and paste onto the new canvas. Move it around until you like what you see. Crop. I usually mirror the image for a slight variation to the main tag.
Add a new raster layer & fill with a bold colour to match your tag. Selections, select all, selections modify contract by 2, delete. Make sure your border (top) layer is active. Effects, distortion, Lens distortion, same settings as above.
Select the black bits at the top, bottom and sides with your magic wand & press delete on all layers.Effects, Eye Candy 4000 Glass with the same settings used in your main tag. Repeat the glass effect, drop shadow.
Add your name and copyright to tag & av & you're finished!
Supplies:
Tube of choice. I used the awesome art of Ismael Rac. If you want to use his art you must purchase your own tube HERE
Filters : Filter Factory C, Eye Candy 4000 Font : I used Shark Random Funnyness Let's start! Open a new canvas 600 x 250. Effects Filter Factory C, Interference with these settings:

Colourise to suit your tube.
Copy and paste your tube, position to the left, drop shadow. I use Lokas 3d shadow:

Copy and paste your close up & position to the right. Drop shadow & duplicate. On the original, effects texture effects mosaic antique. Lower the opacity of both close ups to get the desired effect. Mine is 30 for the textured layer & 60 for the tube.
Add a new raster layer & fill with a bold colour to match your tag. Selections, select all, selections modify contract by 5, delete. Selections, invert. Selections, modify, contract by 2, delete. Select none. Effects, distortion, Lens distortion. Select the black bits at the top, bottom and sides with your magic wand & press delete on all layers.
Make sure your border (top) layer is active. Effects, Eye Candy 4000 Glass with these settings:

The green colour is the default for this filter. You could change the colour if you want, I just left it & it didn't spoil the effect!!
Add your name & copyright info. You could add some flowers or other elements if you like. I added a doodle behind the tube layers. Be careful not to have the doodle poking your tube in the nose! To make sure this doesn't happen, just make sure the tube layer is active, and selections, select all, float defloat and hit delete on your doodle layer. Make sure none of the doodle is on the outside of the border - unless you like it that way!
To make your avatar, open a new canvas 150 x 150, On your main tag, close the credit layer and your name layer, copy merged and paste onto the new canvas. Move it around until you like what you see. Crop. I usually mirror the image for a slight variation to the main tag.
Add a new raster layer & fill with a bold colour to match your tag. Selections, select all, selections modify contract by 2, delete. Make sure your border (top) layer is active. Effects, distortion, Lens distortion, same settings as above.
Select the black bits at the top, bottom and sides with your magic wand & press delete on all layers.Effects, Eye Candy 4000 Glass with the same settings used in your main tag. Repeat the glass effect, drop shadow.
Add your name and copyright to tag & av & you're finished!
Tuesday, August 3, 2010
8:50 PM | Edit Post
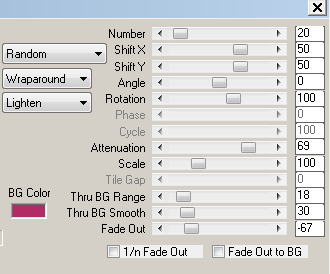 Copy & paste your tube. I placed mine to the right of the canvas. I lowered the opacity to 64 & applied Xero Porcelain on the default settings, but I changed
the blue channel to 0. Drop shadow.
Copy and paste your tube again, resize 60% and drop shadow. Apply the porcelain filter again. I moved this one behind the first tube so it looks like it's sort of lurking in the background! Let your tube speak to you and tell you where to place it!
Copy & paste your tube again if you want!
Add a new raster layer & floodfill with a gradient to suit your tube. Selections, select all, selections modify, contract by 1 delete. Selections invert. Effects
Distortion effects displacement map with these settings
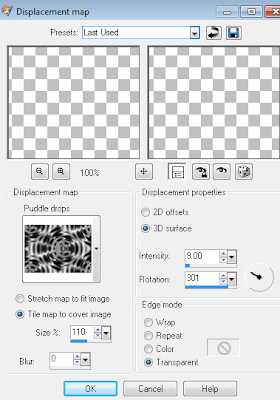 Gradient Glow and Drop shadow.
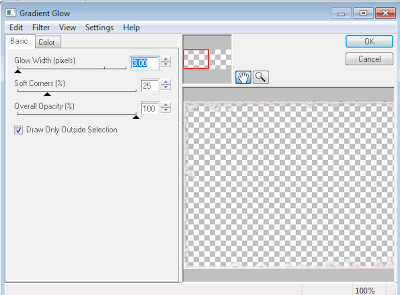 Copy merged. Open a new canvas 150 x 150 & paste your copied image. Move it around until you lilke what you see. I usually mirror the image for a slight
variation to the main tag.
Add a new raster layer & floodfill with a gradient to suit your tube. Selections, select all, selections modify, contract by 1 delete. Selections invert. Apply the same displacement map effect used on the main tag.
Add your name and copyright to tag & av & you're finished!
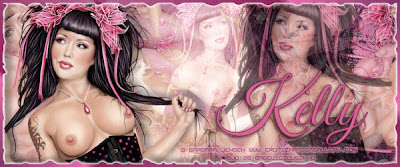
Mona made this sample from my tut, isn't it cool? Thanks so much Mona!
As always, click to show full size.

Labels:Tutorials Forum Set | 2
comments
Subscribe to:
Posts
(Atom)


