29 September 2012

Please click tag to view full size.
This tutorial was written by me on 29 September 2012 and updated on
29 Sseptember 2022. Any similarity to other tutorials is not intentional.
Supplies:
Tube of choice - I have used a very cute Caron Vinson tube which you can purchase at CDOHERE
Scrapkit - I used a gorgeous collab kit by Tamie and Vicki called Trick or Treat, thanks both of you! You can download this kit HERE
Mask - I used Mask_Vivienne_0072, download it HERE
Filters - Xero Radiance
Font of choice, I used We are in Love
Don't forget to leave some love when you download!
Let's start!
Open a new canvas 800 x 800, floodfill white.
Create a new layer above the background layer. Selections, select all. Copy and paste paper 1 into selection, select none. Load your mask and merge group.
Copy and paste TrickorTreatEle27. Click inside with your magic wand, selections, modify, expand by 5. Copy and paste paper 5 as a new layer under the frame layer, selections, invert, delete. Copy and paste your close up above the paper layer, delete. Select none. Lower the opacity on the tube layer to about 38.
Copy and paste the haunted house, element 23 above the mask layer.
Drop shadow each element as you go, and see my tag for placement.
Copy and paste ele13_SV, re-size 80%
Copy and paste ele4_SV re-size 60%
Copy and paste TrickorTreatEle1, re-size 80%. />
Copy and paste TrickorTreatEle12 re-size 60%,
Copy and paste TrickorTreatEle20, re-size 60%
Copy and paste TrickorTreatEle21, re-size 60%. .
Copy and paste ele5_SV, re-size 40%
Copy and paste your tube, effects xero radiance, just hit random until you see an effect you like. Duplicate the tube, and on the copy, adjust blur, gaussian blur 3. Change the blend mode to soft light. Drop shadow the original layer.
Crop your tag, re-size and add some sparkles!!
Add your name and your artist's copyright & you're finished!


This tutorial was written by me on 29 September 2012 and updated on
28 September 2022. Any similarity to other tutorials is not intentional.
Supplies:
Tube of choice - I have used a cheeky witch tube by Eugene Rzhevski. If you want to use the same tube you can purchase it and a license to use it at HERE.
Scrapkit - I used a gorgeous kit Shelley Lynn Designs called Pink-O-Ween, thanks Shelley Lynn! You can purchase this kit HERE.
Template - I used Template 42 by Tamie at Addictive Pleasures, thanks Tamie! You can download it HERE
Mask - I used Mizteeque Mask 303 which you can download HERE
Filters - Xero Radiance and Eye Candy 4000 gradient glow
Font of choice, I used Jungle Friends
Don't forget to leave some love when you download!
Let's start!
Open your template, shift D to duplicate it and delete the original template. Change the resolution to 72 dpi and re-size 800 x 659. Delete the credits and text layers. Open the bg layer and floodfill white.
Create a new layer above the background layer. Selections, select all. Copy and paste a paper into selection or fill with a colour or grandient, select none. Load your mask and merge group.
On the template layers:
On rectangle 2 layer, merge down (merging the two rectangles). Add a new rastr layer, selections, select all, float, defloat (float/defloat). Copy and paste paper 12 into selection, select none. Back to the rectangle 2 layer, float/defloat, invert, delete on the paper layer, select none. Delete the original template layer. Apply a gradient glow if you want to, and drop shadow.
On rectangle 4 merge down (merging rectangles 3 and 4). Create a new raster layer above this layer. Follow the above steps using paper 5.
Repeat as follows;
Circle layer - paper 15
Strip layer- paper 14
Rectangle 5 - paper 2
On Strip 2 layer, float/defloat, new raster layer, fill with a gradient of your choice.
Layers 3 and 4 - paper 9
Layer 1 - paper 4
See my tag for placement of elements, drop shadow as you go.
Copy and paste element 49 the Hocus Pocus mug. Re-size 35% and move to the left side of your tag.
Copy and paste element 19 re-size 35%. right.
Copy and paste one of the spiderwebs, re-size 40%. Copy and paste one of the spiders, re-size 15%.
Copy and paste your tube, effects xero radiance, just hit random until you see an effect you like. Duplicate the tube, and on the copy, adjust blur, gaussian blur 3. Change the blend mode to soft light. Drop shadow the original layer.
Copy and paste element 25, re-size witch, 30%.
Copy and paste element 27, re-size witch, 28%.
Copy and paste test element 33, re-size 28%.
Copy and paste element 66, re-size 40%>
Copy and paste element 38, re-size 15%.
Add some sparkles here!!
Add your name, crop and re-size your tag, and add your artist's copyright & you're finished!
This is the original sample tag.
28 September 2012

This tutorial was written by me on 28 September 2012 and updated on
30 September 2022. Any similarity to other tutorials is not intentional.
Supplies:
Tube of choice - I have used a fabulous tube by irmino. If you want to use the same tube you can purchase it at HERE.
Scrapkit - I used this awesome kit by Crystals Creations called Friendship Love. You can download this kit HERE.
Mask - I used WSL 099, which you can download HERE
Filters - Xero Radiance, Eye Candy 4000 gradient glow
Font of choice, I used 2Peas Short Blonde
Don't forget to leave some love when you download!
Let's start!
Open a new canvas 800 x 800, floodfill white.
Create a new raster layer, selections all and copy paper fl_pp10 into selection. Load your mask, merge group.
Copy and paste fl_ee14, re-size 110%. Copy and paste paper fl_pp1 under the frame layer. Click inside the frame with your magic wand, selections, modify, expand by 5. Selections invert, and delete on the paper layer. Drop shadow the frame.
Drop shadow each element as you go, see my tag for placement.
Copy and paste flower element fl_ee35, re-size 40%
Copy and paste butterfly element fl_ee9, re-size 50%
Copy and paste dice element fl_ee37 re-size 40%.
Copy and paste flower element fl_ee25 re-size 70%
Copy and paste bead string element fl_ee1, re-size 70%
Copy and paste the doggy bear element fl_ee31, re-size 40%, image mirror
Copy and paste gift element fl_ee34, re-size 45%
Copy and paste hearts element fl_ee12, re-size 80%
Copy and paste your tube, effects xero radiance, just hit random until you see an effect you like. Duplicate the tube, and on the copy, adjust blur, gaussian blur 3. Change the blend mode to soft light. Drop shadow the original layer.
Crop your tag and re-size. Add some sparkles and your name and artist's copyright and you're finished!
This is the original sample tag.

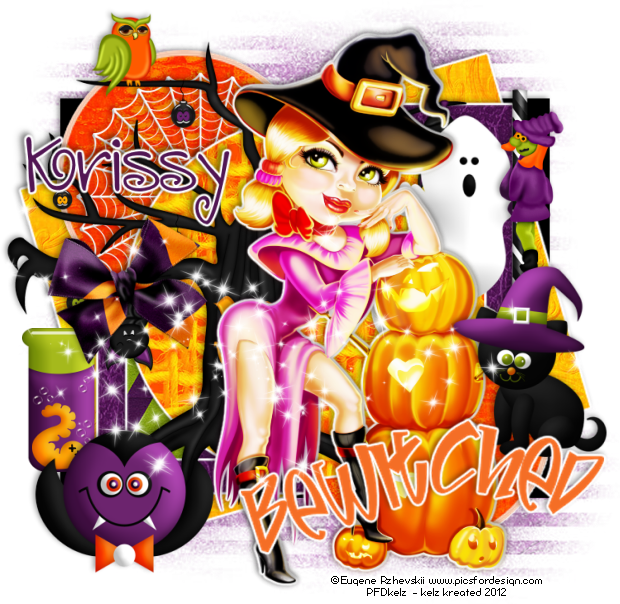
27 September 2012

This tutorial was written by me on 27 September 2012 and updated on
30 September 2022. Any similarity to other tutorials is not intentional.
Supplies:
Tube of choice - I have used a gorgeous tube by Eugene Rzhevski. This is an Exclusive tube at PFD HERE.
Scrapkit - I used a fantastic kit by Bella Caribena called Welcome My Pretties, thanks Bella! You can purchase this kit HERE.
Mask - I used WSL 261, which you can download HERE
Filters - Xero Radiance
Font of choice, I used Ghosting
Don't forget to leave some love when you download!
Let's start!
Open a new canvas 800 x 800
Drop shadwow elements as you go, see my tag for placement
Copy and paste the flower element BC-WelcomeMyPretties-El (95)
Copy and paste the haunted castle element BC-WelcomeMyPretties-El (41), re-size 60%.
Copy and paste element BC-WelcomeMyPretties-El (92), re-size 60%
Copy and paste element BC-WelcomeMyPretties-El (23).
Copy and paste element BC-WelcomeMyPretties-El (86), re-size 60%
Copy an paste element BC-WelcomeMyPretties-El (135), re-size 45%
Create a new raster layer above the background layer, selections, select all. Copy and paste paper PP (11) into selection. Load your mask, merge group. Image flip. Lower the opacity to about 44.
Copy and paste your tube, effects xero radiance, just hit random until you see an effect you like. Duplicate the tube, and on the copy, adjust blur, gaussian blur 3. Change the blend mode to soft light. Drop shadow the original layer.
Crop your tag and re-size. Add some sparkles!
Add your name and your artist's copyright and you're finished!
This is the original sample tag.

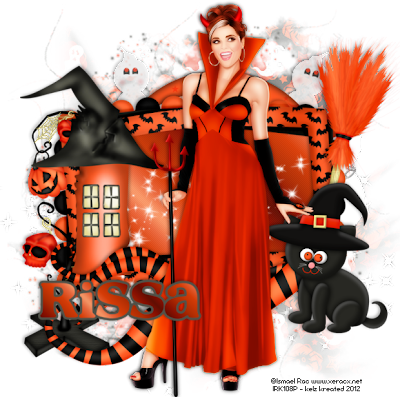
26 September 2012

This tutorial was written by me on 26 September 2012 and updated on
30 September 2022. Any similarity to other tutorials is not intentional.
Supplies:
Tube of choice - I have used a stunning tube by Attila. If you want to use the same tube you can purchase it and a license to use it at Elegance Fly HERE .
Scrapkit - I used a gorgeous kit by Wicked Diabla called Selena, thanks Izzy! You can purchase this kit HERE.
Mask - I used WSL 105, which you can download HERE
Filters - Xero Radiance
Font of choice, I used Watermelon Script 2
Don't forget to leave some love when you download!
Let's start!
Open a new canvas 800 x 800, floodfill white
.
Copy and paste frame element 78 as a new layer. Click OUTSIDE the frame with your magic wand, selections, modify, expand by 5. Copy paper 6 as a new layer, delete. Drop shadow the frame layer.
Create a new raster layer above your background layer. Selections, select all. Copy and paste paper 1 into selection, select none. Load your mask and merge group.
Drop shadwow elements as you go, see my tag for placement
Copy and paste lamp element 10, re-size 40%.
Copy and paste element 73, re-size 40%
Copy and paste fan element 13, re-size 40%.
Copy and paste ribbon element 44, re-size 40%.
Copy and paste ghost element 92, re-size 40%.
Copy and paste spider element 85, re-size 15%.
Copy and paste skeleton skull element 25, re-size 25%.
Copy and paste Spooky wordart element 63, re-size 30%
Copy and paste your tube, effects xero porcelain, default settings but lower the softness setting to 9. Duplicate the tube, and on the copy, adjust blur, gaussian blur 3. Change the blend mode to screen and lower the opacity to about 52. Drop shadow the original layer.
Crop your tag and re-size. Add some sparkles!
Add your name and your artist's copyright and you're finished!
This is the original sample tag.

25 September 2012

This tutorial was written by me on 25 September 2012. Any similarity to other tutorials is not intentional.
Supplies:
Tube of choice. I am using a gorgeous tube by Marika. You can purchase her art and a license to use it at CDO
Scrapkit - I used a mini kit by Scottish Butterfly called black Skull. You can download this kit HERE
Template - I used Template 80 by Blissfully Beth, you can download it HERE
Mask - I used Vix Monday mask 1, which you can download HERE
Filters - Xero Radiance and Porcelain, Eye Candy 4000 gradient glow
Font of choice, I used Hasta La Pasta NF
Don't forget to leave some love when you download!
Let's start!
Open your template, shift D to duplicate and delete the original. Delete the credits layer and the line 3 layer. Close the background layer and crop. Re-size the tag 650 x 476. Increase the canvas size 750 x 576. Open the background layer and floodfill it white. Move the words down.
Line 2 Layer - selections, select all, float, defloat, copy paper 3. Selections, invert, delete, select none. Delete the original template layer. Apply a gradient glow and drop shadow.
Repeat for the other template layers, this is what I used:
Line 1 - paper 1
Circle - paper 5
Circle frame - paper 3
Create a new raster layer above the background layer. Selections, select all, copy paper into selection, select none. Apply your mask and merge group.
Drop shadow each element as you go.
Copy and paste the wire and place towards the bottom of the tag.
Copy and paste element 2, the star swirl. Move to the top right. Duplicate and move to the bottom left.
Copy and paste the yellow and black stars as your top layer.
Copy and paste the bow, re-size 70% and place on the left of your frame.
Copy and paste the flower, re-size 80% and place on the left of the frame. Duplicate and image mirror.
Copy and paste the spiky heart, element 4. Duplicate and place them together at the bottom of your tag.
Add some sparkles.
Copy and paste your tube, effects xero radiance, just hit random until you see an effect you like. Duplicate the tube, and on the copy, adjust blur, gaussian blur 4. Change the blend mode to soft light. Drop shadow the original layer.
Apply a gradient glow to the word art layer.
Add your name, re-size your tag, and add your artist's copyright & you're finished!

This tutorial was written by me on 24 September 2012. Any similarity to other tutorials is not intentional.
Supplies:
Tube of choice. I am using a stunning tube by Celinart which I purchased when she was selling at SATC
Scrapkit - I used a kit by MistyLynn called Emo What. You can purchase this kit HERE
Mask - I used Gemsmask 93, which is no longer available to download, use one you have in your stash!
Filters - Xero Radiance and Porcelain, Eye Candy 4000 gradient glow
Font of choice, I used MA Sexy
Don't forget to leave some love when you download!
Let's start!
Open a new canvas 700 x 700, floodfill white.
Copy and paste frame 2 re-size 80%. Click inside with your magic wand, selections, modify, expand by 5. Copy and paste paper 6 under the frame layer, selections, invert, delete, select none. Drop shadow the frame.
Copy and paste your tube, effects xero radiance, just hit random until you see an effect you like. Duplicate the tube, and on the copy, adjust blur, gaussian blur 4. Change the blend mode to soft light. Drop shadow the original layer.
Copy and paste paper 5 as a new layer above your background layer, load mask. Merge group.
Drop shadow your elements as you go.
Copy and paste feather 1 above your mask layer,and re-size 50%.
Copy and paste skull 2 above your frame layer.
Copy and paste flowers 1, 2 and 3 re-size 25%. Duplicate each flower and arrange around your frame.
Copy and paste skull pocket, re-size 30% and place on the bottom right of your tag.
Copy and paste the clip, re-size 30% and place on the top right of your frame.
Copy and paste the teddy, re-size 30%, and place bottom left of your frame.
Copy and paste the skull, re-size 25% and place in the top left corner of the frame.
Crop your tag and re-size. Add some sparkles!
Add your name and your artist's copyright and you're finished!
24 September 2012
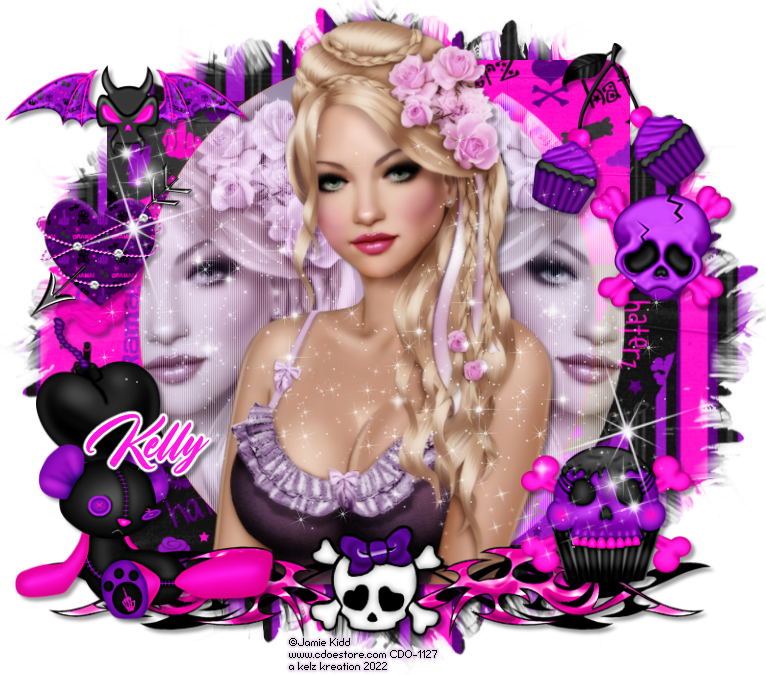
This tutorial was written by me on 24 September 2012 and updated on
5 October 2022. Any similarity to other tutorials is not intentional.
Supplies:
Tube of choice - I am using a gorgeous tube by Jamie Kidd. You can purchase this tube at CDO HERE.
Scrapkit - I am using Krisy's part of a collab called No Drama Haterz she did with Crystal, you can download it at Toxic Desirez HERE
Template - I used Template 865 by Millie's PSP Madness which you can download HERE
Mask - I used a fab mask by sylvie, SC_mask013 which you can download HERE
Filters - Xero Porcelain
Font of choice - Mystic crystal
Don't forget to leave some love when you download!
Let's start!
Open the template, shift D to duplicate and close the original. Image re-size 800 x 707. Delete the credits and wordart layers.
Working from bottom to top layers -
Layer 1 - Selections, select all, float, defloat, copy paper 12 as a new layer, selections invert delete, select none. Delete original template layer.br /> br /> Do the same for each template layer. These are the papers I used.
Layer 2 - Paper 20
Layer 3 - Paper 11
Layer 4 - Paper 9
Layer 5 - Paper 6
Layer 6 - Paper 10
Layer 7 - New raster layer, float defloat, fill with a gradient to suit your tag. Paste your close up tube, invert, delete. Duplicate, mirror, merge down. Effects xero porcelain, default settings but change the softness to 12. Duplicate the tube, and on the copy, adjust blur, gaussian blur 3. Change the blend mode to soft light. Drop shadow the original layer, blend mode to Luminance L.
Drop shadwow elements as you go, see my tag for placement
Copy and paste your main tube, effects xero porcelain, default settings but change the softness to 12. Duplicate the tube, and on the copy, adjust blur, gaussian blur 3. Change the blend mode to soft light. Drop shadow the original layer.
Copy and paste element winged skull, re-size 35%
Copy and paste element cupcake, re-size 30%
Copy and paste element skull 2, re-size 27%
Copy and paste element bomb, re-size 40%
Copy and paste element Teddy, re-size 40%
Copy and paste element Doodle
Copy and paste element cherry cakes, re-size 40%
Copy and paste element barbed heart, re-size 30%
Create a new raster layer above the background layer. Selections, select all, copy and paste paper into selection, select none. Load your mask, merge group. Lower the opacity to about 54.
Crop your tag and re-size. Add some sparkles!
Add your name and your artist's copyright and you're finished!
This is the original sample tag


This tutorial was written by me on 24 September 2012 and updated on
30 September 2022. Any similarity to other tutorials is not intentional.
Supplies:
Tube of choice - I am using a fabulous tube by Nocturne which you can purchase HERE
Scrapkit - I used a stunning kit by ShellyLynn Designs called Rattle My Bones. You can purchase this kit HERE
Mask - I used Trese Mask0008, which you can download HERE
Filters - Xero Radiance and Porcelain, Eye Candy 4000 gradient glow
Font of choice, I used Tabina
Don't forget to leave some love when you download!
Let's start!
Open a new canvas 800 x 800. Copy and paste frame 8. Image rotate, left 90. Image re-size 110%.
Use your magic wand to select inside the frame. Selections, modify, expand by 5. Copy and paste paper 7 as a new layer under your frame layer. Re-size 50%. Adjust the paper to get the look you want. Crop.
Drop shadwow elements as you go, see my tag for placement
Copy and paste pumpkin element 88, re-size 30%.
Copy and paste cupcake element 101, re-size 25%
Copy and paste bottle element 95, re-size 30%
Copy and paste element 17, re-size 30%. .
Copy and paste element 110, re-size 35%. .
Copy and paste element 27, re-size 25% .
Copy and paste bat element 22, re-size 25% .
Copy and paste your tube, effects xero porcelain, default settings but change the softness to 12. Duplicate the tube, and on the copy, adjust blur, gaussian blur 3. Change the blend mode to soft light. Drop shadow the original layer.
New raster layer above your background layer. Selections, select all, copy and paste paper 7 into selection, select none. Load your mask, merge group.
Crop your tag and re-size. Add some sparkles!
Add your name and your artist's copyright and you're finished!
This is the original sample tag


This tutorial was written by me on 24 September 2012 and updated on
30 September 2022. Any similarity to other tutorials is not intentional.
Supplies:
Tube of choice - I am using a stunning tube by Tarya. You can purchase this tube at Elegance Fly HERE.
Scrapkit - This gorgeous kit "Hallows Splendor" is by ShellyLynn Designs, thanks ShellyLynn! You can purchase this kit HERE
Mask - I used Miz_Mask_372, which you can download HERE
Filters - Xero Porcelain,
Font of choice - I used Black Cat
Don't forget to leave some love when you download!
Let's start!
Open a new canvas 800 x 800 and floodfill white.
Copy and paste frame 8 as a new layer, re-size 80%.
New raster layer under frame layer, selections, select all, paste paper 9 into selection, re-size 80%. On the frame layer, click inside the frame with your magic wand, selections modify expand by 5, selections invert delete, select none.
Drop shadwow elements as you go, see my tag for placement
Copy and paste your tube, effects xero porcelain, default settings but change the softness to 12. Duplicate the tube, and on the copy, adjust blur, gaussian blur 3. Change the blend mode to soft light. Drop shadow the original layer.
Copy and paste element 1, re-size 60%
Copy and paste element 88, re-size 70%
Copy and paste element 92, re-size 45%
Copy and paste element 15 re-size 40 %
Create a new raster layer above the background layer. Selections, select all, copy and paste paper8 into selection, select none. Load your mask, merge group. Lower the opacity to about 54.
Crop your tag and re-size. Add some sparkles!
Add your name and your artist's copyright and you're finished!
This is the original sample tag
23 September 2012

This tutorial was written by me on 23 September 2012, and edited on 30 September 2022. Any similarity to other tutorials is not intentional.
Supplies:
Tube of choice - I am using a fantastic tube by Alicia Mujica. You can purchase this tube HERE
Scrapkit - This kit "Emo Furry Friends" is by Crystals Creations and it was PTU but is now FTU!! Thanks Crystal! You can download this kit HERE
Filters - Xero Radiance
Font of choice - I used CAC Champagne
Don't forget to leave some love when you download!
Let's start!
Open a new canvas 800 x 800 and floodfill white.
Drop shadwow elements as you go, see my tag for placement
Copy and paste element 36. Duplicate and flip.
Copy and paste element 19, duplicate and mirror.
Copy and paste element 5.
Copy and paste frame element 14 and re-size 125%. Click inside with your magic wand, selections, modify, expand by 5. Copy and paste paper 11 below the frame layer and re-size 70%. Selections, invert delete, select none. Drop shadow the frame layer.
Copy and paste element 12 re-size 60%.
Copy and paste your tube, effects xero radiance, just hit random until you see an effect you like. Duplicate and on the copy, adjust blur, gaussian blur 3. Change the blend mode to soft light or a blend mode to suit your tube. Drop shadow the original layer.
Copy and paste element 17, re-size 75%.
Copy and paste element 18, re-size 55%
Copy and paste element 1, re-size 50%
Copy and paste element 34 re-size 70% and mirror.
Crop your tag and re-size. Add some sparkles!
Add your name and your artist's copyright and you're finished!
This is the original sample tag


This tutorial was written by me on 23 September 2012 and updated on
1 October 2022. Any similarity to other tutorials is not intentional.
Supplies:
Tube of choice - I used an awesome tube by Jamie Kidd which you can purchase at CDO HERE.
Scrapkit - I used a gorgeous kit by Toxic Desirez called Frankie Rawk. You can download it HERE
Filters - Xero Porcelain
Font of choice - CAC Shishoni Scrpit
Don't forget to leave some love when you download!
Let's start!
Open a new canvas 800 x 800 and floodfill white.
Copy and paste frame 2, re-size 90%.
New raster layer under frame layer, selections, select all, paste paper 2 into selection. On the frame layer, click inside the frame with your magic wand, selections modify expand by 5. On the paper layer, selections invert delete, select none.
Drop shadwow elements as you go, see my tag for placement
Copy and paste your tube, effects xero porcelain, default settings but change the softness to 12. Duplicate the tube, and on the copy, adjust blur, gaussian blur 3. Change the blend mode to soft light. Drop shadow the original layer.
Copy and paste element buttons re-size 60%
Copy and paste element teddy re-size 45%
Copy and paste element cuppy re-size 30%
Copy and paste element lips re-size 50%
Copy and paste element skull 3 re-size 30%
Copy and paste element bow 4 re-size 50%
Copy and paste spatter, lower the opacity to about 45. Duplicate image mirror image flip
Crop your tag and re-size. Add some sparkles!
Add your name and your artist's copyright and you're finished!
This is the original sample tag

Subscribe to:
Comments
(Atom)
Snag My Blinkie

Forum I'm At!!

Blogs I Like


