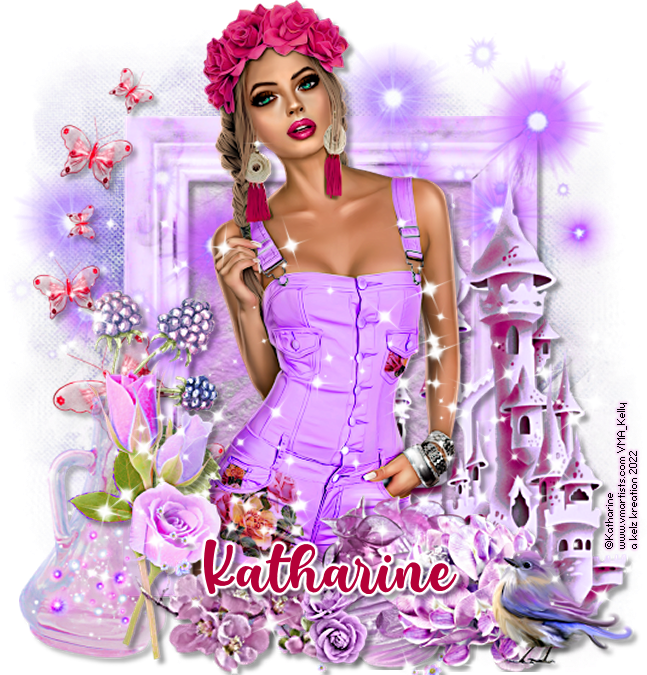
07 December 2022
~*~ CT tag for Irish Princess Designs ~*~
This gorgeous kit is full of so many lovely elements for your Christmas tagging! Grab a copy today!
Stores:
Artistic Designz
Mystical
Smiley Shop
Scraps and Company (Not all kits are in her store yet - Store Currently Down)
Fan Group
Blog


This gorgeous kit is full of so many lovely elements for your Christmas tagging! Grab a copy today!
Stores:
Artistic Designz
Mystical
Smiley Shop
Scraps and Company (Not all kits are in her store yet - Store Currently Down)
Fan Group
Blog
22 November 2022
21 November 2022

This tutorial was written by me on 21 November 2022. Any similarity to other tutorials is not intentional.
Supplies:
Tube - I used a gorgeous VeryMany tube called Beach Party 11 which you can purchase HERE.
Scrapkit - This stunning kit is called Sea of Leaves and is full of gorgeous elements which you can use for summer, beach or Autumn tags! You can purchase this kit at several stores:
Artistic Designz
Mystical Scrap Store
Smiley Shop
Scraps and Company
Fan Group
Blog
Filters - Xero Porcelain, Mura Meisters copies
Font of choice - Lemon Delight
Let's start!
Open a new canvas 800 x 800 and floodfill white.
Copy and paste element 181, re-size 20%. Mura Meister copies with these settings.

Re-size 120%. Duplicate, image rotate left 10, merge down.
Click inside your frame with your magic wand, selections, modify, expand by 5. Paste paper 24, as a new layer under the frame layer, re-size 65%. Selections, invert, delete. Drop shadow the frame layer.
Drop shadow elements as you go, see my tag for placement
Copy and paste your tube, effects xero porcelain, default settings but change the softness to 12. Drop shadow.
Copy and paste element 117, re-size 60%, duplicate, image mirror.
Copy and paste element 33, re-size 30%
Copy and paste frame 2, re-size 80%.
Copy and paste element 34, re-size 30%
Copy and paste element 190, re-size 50%
Copy and paste element 78, re-size 20%, duplicate, image mirror.
Copy and paste element 119, re-size 20%
Copy and paste element 211, re-size 25%
Copy and paste element 134, re-size 30%
Copy and paste element 130, re-size 35x%.
Copy and paste element 128, re-size 20x%
Copy and paste element 36, re-size 20%
Crop your tag and re-size. Add some sparkles!
Add your name and your artist's copyright and you're finished!
19 November 2022

This tutorial was written by me on 19 November 2022. Any similarity to other tutorials is not intentional.
Supplies:
Tube - I used the gorgeous tube called Tea Time by ViNina, which you can purchase HERE
Scrapkit - I used Tea Time by All Dolled up. You can purchase this kit from HERE.
Mask - Mask of choice
Filters - Xero Porcelain
Font of choice - My Happy Ending
Don't forget to leave some love when you download!
Let's start!
Open a new canvas 800 x 800 and floodfill white.
Copy and paste frame element 31, re-size 115%.
Click inside your frame with your magic wand, selections, modify, expand by 5. Paste paper 5 as a new layer under the frame layer, re-size 75%. Selections, invert, delete. Drop shadow the frame layer.
Drop shadow elements as you go, see my tag for placement
Copy and paste your tube, effects xero porcelain, default settings but change the softness to 12. Drop shadow.
Copy and paste element 143, re-size 70%
Copy and paste element 132, re-size 60%
Copy and paste element 102, re-size 60%.
Copy and paste element 18, re-size 60%
Copy and paste element 143, re-size 50%
Copy and paste element 44, re-size 30%
Copy and paste element 79, re-size 60%
Copy and paste element 9, re-size 60%
Copy and paste element 23, re-size 40%
Copy and paste element 35, re-size 60%.
Copy and paste element 42, re-size 30%, mirror
Copy and paste element 64, re-size 40%
Copy and paste element 3, re-size 30%
Copy and paste element 21, re-size 30%
Copy and paste element 130, re-size 15%
Create a new raster layer above the background layer. Selections, select all, copy and paste paper 4 into selection, select none. Load your mask, merge group.
Crop your tag and re-size. Add some sparkles!
Add your name and your artist's copyright and you're finished!
18 November 2022

This tutorial was written by me on 18 November 2022. Any similarity to other tutorials is not intentional.
Supplies:
Tube - I used the stunning Rose in the Dark tube by Katharine Art. You can purchase this tube at VM ARTISTS.
Scrapkit - I used a gorgeous Doodle By Design kit called Celebrando A Los Muertos. You can purchase this tube at DEEDLES AND DOODLES.
Mask - I used SophisticatSimoneMasks0273 Simone at Scrappy Bit of Fun. You can download the mask HERE
Filters - Xero Porcelain
Font of choice - Beat Drop
Don't forget to leave some love when you download!
Let's start!
Open a new canvas 800 x 800 and floodfill white.
Copy and paste frame element 5, re-size 80%.
Click inside your frame with your magic wand, selections, modify, expand by 5. Paste paper 10 as a new layer under the frame layer, selections, invert, delete. Drop shadow the frame layer.
Drop shadow elements as you go, see my tag for placement
Copy and paste your tube, effects xero porcelain, default settings but change the softness to 12. Drop shadow.
Copy and paste element 22, re-size 50%, mirror
Copy and paste element 20, re-size 60%
Copy and paste element 13.
Copy and paste element 53, re-size 40%
Copy and paste element 106, re-size 50%, duplicate, mirror.
Copy and paste element 101, re-size 50%
Copy and paste element 40, re-size 30%
Copy and paste element 56, re-size 30%
Copy and paste element 67, re-size 30%
Copy and paste element 89, re-size 45%, dupicate, mirror
Copy and paste element 59, re-size 30%
Copy and paste element 1, re-size 50%
Copy and paste element 41, re-size 40%
Copy and paste element 8, re-size 40%
Create a new raster layer above the background layer. Selections, select all, copy and paste paper 1 into selection, select none. Load your mask, merge group.
Crop your tag and re-size. Add some sparkles!
Add your name and your artist's copyright and you're finished!
15 November 2022

12 November 2022

This tutorial was written by me on 12 November 2022. Any similarity to other tutorials is not intentional.
Supplies:
Tube - I used a beautiful Chris Pastel tube called Athena which you can purchase HERE
Scrapkit - I used the gorgeous Crisp Autumn Morn by Irish Princess Designs. You can purchase this kit from Artistic Designz, Mystical Scrap Store, Smiley Shop or Scraps and Company (Not all kits are in her store yet - Store Currently Down).
Be sure to check out Kate's blog HERE.
Mask of choice
Filters - Xero Porcelain
Font of choice - Reisling
Let's start!
Open a new canvas 800 x 800 and floodfill white.
Copy and paste frame element 8.
Click inside your frame with your magic wand, selections, modify, expand by 5. Paste paper 4 as a new layer under the frame layer, selections, invert, delete. Drop shadow the frame layer.
Drop shadow elements as you go, see my tag for placement
Copy and paste your tube, effects xero porcelain, default settings but change the softness to 12. Drop shadow.
Copy and paste element 37, re-size 35%
Copy and paste element 11, re-size 50%, mirror
Copy and paste element 39, re-size 30%.
Copy and paste element 29, re-size 15%
Copy and paste element 66, re-size 80%
Copy and paste element 131, re-size 35%
Copy and paste element 155, re-size 55%
Copy and paste element 163, re-size 40%, flip
Copy and paste element 29 again, re-size 20%
Copy and paste element 47, re-size 30%.
Copy and paste element 41, re-size 30%
Copy and paste element 50, re-size 20%
Copy and paste element 35, re-size 20%
Copy and paste element 56, re-size 15%
Copy and paste element 133, re-size 15%
Create a new raster layer above the background layer. Selections, select all, copy and paste paper 24 into selection, select none. Load your mask, merge group.
Crop your tag and re-size. Add some sparkles!
Add your name and your artist's copyright and you're finished!
11 November 2022

This tutorial was written by me on 11 November 2022. Any similarity to other tutorials is not intentional.
Supplies:
Tube - I used a gorgeous Misticheskaya tube called Raegan which you can purchase at Picsfordesign. This is an Exclusive so if you're a member you can download it.
Scrapkit - I used a beautiful kit called Lady in Black by All Dolled up, which you can purchase HERE.
Mask - I used WSL mask 353 which you can download HERE
Filters - Xero Porcelain
Font of choice - Pyktor
Don't forget to leave some love when you download!
Let's start!
Open a new canvas 800 x 800 and floodfill white.
Copy and paste frame element 88, re-size 125%.
Click inside your frame with your magic wand, selections, modify, expand by 5. Paste paper 10 as a new layer under the frame layer, selections, invert, delete. Drop shadow the frame layer.
Drop shadow elements as you go, see my tag for placement
Copy and paste your tube, effects xero porcelain, default settings but change the softness to 15, Drop shadow.
Copy and paste element 34, re-size 45%. Duplicate, image mirror.
Copy and paste element 24, re-size 50%, image flip. Duplicate, image mirror.>
Copy and paste element 43, re-size 60%.
Copy and paste element 68, re-size 65%
Copy and paste element 54, re-size 50%
Copy and paste element 98, re-size 45%
Copy and paste element 67, re-size 45%
Copy and paste element 44, re-size 60%
Copy and paste element 89, re-size 50%
Copy and paste element 72, re-size 40%
Create a new raster layer above the background layer. Selections, select all, copy and paste paper 4 into selection, select none. Load your mask, merge group.
Copy and paste element 43, duplicate a couple of times and arrange around your tag.
Crop your tag and re-size. Add some sparkles!
Add your name and your artist's copyright and you're finished!

This tutorial was written by me on 11 November 2022. Any similarity to other tutorials is not intentional.
Supplies:
Tube - I used a stunning Jose Cano tube called Lucille which you can purchase HERE.
Scrapkit - I used Pinkilicious by Wicked Diabla, you can purchase this kit HERE.
Mask - I used WSL mask 344 which you can download HERE
Filters - Xero Porcelain
Font of choice - Puppies Bellies
Don't forget to leave some love when you download!
Let's start!
Open a new canvas 800 x 800 and floodfill white.
Copy and paste frame element 60, re-size 85%.
Click inside your frame with your magic wand, selections, modify, expand by 5. New raster layer and fill with a gradient of your choice. Paste your close up tube, invert and delete, select none. Effects xero porcelain, default settings but change the softness to 12. Duplicate the tube, and on the copy, adjust blur, gaussian blur 3. Change the blend mode to soft light. Drop shadow the original layer and change the blend mode to Luminance L. Drop shadow the frame and original tube layers.
Drop shadow elements as you go, see my tag for placement
Copy and paste element 28, re-size 75%
Copy and paste element 6, re-size 25%
Copy and paste element 7, duplicate and mirror.
Copy and paste element 26, re-size 50%
Copy and paste element 4, re-size 25%
Copy and paste element 24, re-size 60%
Copy and paste element 62, re-size 30%
Copy and paste element 37, re-size 45%
Copy and paste element 54, re-size 35%
Copy and paste element 56, re-size 45%
Copy and paste element 61, re-size 50%
Create a new raster layer above the background layer. Selections, select all, copy and paste paper 2 into selection, select none. Load your mask, merge group.
Crop your tag and re-size. Add some sparkles!
Add your name and your artist's copyright and you're finished!


06 November 2022


04 November 2022


This tutorial was written by me on 4 November 2022. Any similarity to other tutorials is not intentional.
Supplies:
Tube - I used Nocturne's Hot Cocoa which you can purhase at Picsfordesign
Scrapkit - I used October Sky by Irish Princess Designs. You can purchase this kit from Artistic Designz, Mystical Scrap Store, Smiley Shop or Scraps and Company (Not all kits are in her store yet - Store Currently Down).
Be sure to check out Kate's blog HERE.
Mask - I used SC Mask 06 by sylly creationz, which you can download HERE
Filters - Xero Porcelain
Font of choice - Jandy Curlygirl Chunky
Don't forget to leave some love when you download!
Let's start!
Open a new canvas 800 x 800 and floodfill white.
Copy and paste frame element 6, re-size 70%.
Click inside your frame with your magic wand, selections, modify, expand by 5. Paste paper 10 as a new layer under the frame layer, selections, invert, delete. Drop shadow the frame layer.
Drop shadow elements as you go, see my tag for placement
Copy and paste your tube, effects xero porcelain, default settings but change the softness to 12. Drop shadow.
Copy and paste element 170, re-size 80%
Copy and paste element 165, re-size 40% duplicate, mirror
Copy and paste element 96, re-size 45%.
Copy and paste element 145, re-size 45%
Copy and paste element 153, re-size 45% duplicate, mirror
Copy and paste element 87, re-size 30%
Copy and paste element 88, re-size 30%
Copy and paste element 22, re-size 45%
Copy and paste element 11, re-size 50%
Copy and paste element 102, re-size 45%
Copy and paste element 172, re-size 45%
Create a new raster layer above the background layer. Selections, select all, copy and paste paper 12 into selection, select none. Load your mask, merge group.
Crop your tag and re-size. Add some sparkles if you like!
Add your name and your artist's copyright and you're finished!
03 November 2022

This tutorial was written by me on 3 November 2022. Any similarity to other tutorials is not intentional.
Supplies:
Tube - I used a gorgeous Stella Felice 7 tube which you can purchase at Picsfordesign
Scrapkit - I used a beautiful kit called Madeline which you can purchase at All Dolled Up
Mask of choice
Filters - Xero Porcelain
Font of choice - Janda QuirkyGirl
Don't forget to leave some love when you download!
Let's start!
Open a new canvas 800 x 800 and floodfill white.
Copy and paste frame element 40, re-size 136%.
Click inside your frame with your magic wand, selections, modify, expand by 5. Paste paper 1 as a new layer under the frame layer, selections, invert, delete. Drop shadow the frame layer.
Drop shadow elements as you go, see my tag for placement
Copy and paste your tube, effects xero porcelain, default settings but change the softness to 12. Drop shadow.
Copy and paste element 38, re-size 60%
Copy and paste element 41
Copy and paste element 37, re-size 80%.
Copy and paste element 47
Copy and paste element 33, re-size 45%
Copy and paste element 45, re-size 80%
Copy and paste element 143, re-size 50%
Copy and paste element 44, re-size 85%
Copy and paste element 31, re-size 65%
Copy and paste element 51, re-size 60%
Copy and paste element 17
Copy and paste element 99, re-size 40%
Copy and paste element 20, re-size 80%
Copy and paste element 33, re-size 35%
Copy and paste element 28, re-size 40%
Copy and paste element 19, re-size 25%
Copy and paste element 18, re-size 25%
Copy and paste element 153, re-size 25%
Create a new raster layer above the background layer. Selections, select all, copy and paste paper 2 into selection, select none. Load your mask, merge group.
Crop your tag and re-size. Add some sparkles!
Add your name and your artist's copyright and you're finished!
02 November 2022

This tutorial was written by me on 2 November 2022. Any similarity to other tutorials is not intentional.
Supplies:
Tube - I used a stunning tube by Jenny which you can purchase at Elegance Fly.
Scrapkit - I used the beautiful BC-SpessoLAmore by Bella Caribena. Go to her blog to see where you can purchase this kit .
Mask of choice
Filters - Xero Porcelain
Font of choice - I used Summer Camp
Let's start!
Open a new canvas 800 x 800 and floodfill white.
Copy and paste frame element 61.
Click inside your frame with your magic wand, selections, modify, expand by 5. Paste paper 3 as a new layer under the frame layer, resize 70%, selections, invert, delete. Drop shadow the frame layer.
Drop shadow elements as you go, see my tag for placement
Copy and paste your tube, effects xero porcelain, default settings but change the softness to 15.
Copy and paste element 118, re-size 30%
Copy and paste element 87, re-size 50%
Copy and paste element 117, re-size 40%.
Copy and paste element 127
Copy and paste element 106, re-size 40%
Copy and paste element 122, re-size 60%
Copy and paste element 128, re-size 60%
Copy and paste element 91, re-size 40%
Copy and paste element 107, re-size 90%
Copy and paste element 93, re-size 60%
Copy and paste element 126, re-size 20%, duplicate a couple of times and place around your tag. I mirrored a couple
Create a new raster layer above the background layer. Selections, select all, copy and paste paper xx into selection, select none. Load your mask, merge group.
Crop your tag and re-size. Add some sparkles if you like!
Add your name and your artist's copyright and you're finished!
01 November 2022

This tutorial was written by me on 1 November 2022. Any similarity to other tutorials is not intentional.
Supplies:
Tube - I used a gorgeous Verymany witch tube which you can purchase HERE.
Scrapkit - I used a stunning kit called Moon Magick by Irish Princess Designs. You can purchase this kit from Artistic Designz, Mystical Scrap Store, Smiley Shop or Scraps and Company (Not all kits are in her store yet - Store Currently Down).
Be sure to check out Kate's blog HERE.
Mask - I used SophisticatSimone mask 0242 which you can download HERE
Filters - Xero Porcelain
Font of choice - Gothic Ultra
Don't forget to leave some love when you download!
Let's start!
Open a new canvas 800 x 800 and floodfill white.
Copy and paste frame element 6, re-size 55%.
Click inside your frame with your magic wand, selections, modify, expand by 5. Paste paper 10 as a new layer under the frame layer, selections, invert, delete. Drop shadow the frame layer.
Drop shadow elements as you go, see my tag for placement
Copy and paste frame element 3, re-size 65%.
Copy and paste your tube, effects xero porcelain, default settings but change the softness to 12. Duplicate the tube, and on the copy, adjust blur, gaussian blur 3. Change the blend mode to soft light. Drop shadow the original layer.
Copy and paste element 200, re-size 30%
Copy and paste element 148, re-size 25%
Copy and paste element 105, re-size 30%.
Copy and paste element 138, re-size 30%
Copy and paste element 140, re-size 30%, mirror
Copy and paste element 132, re-size 35%
Copy and paste element 144, re-size 25%
Copy and paste element 76, re-size 20%
Copy and paste element 135, re-size 15%
Copy and paste element 84, re-size 10%
Copy and paste element 19, re-size 30%
Create a new raster layer above the background layer. Selections, select all, copy and paste paper 19 into selection, select none. Load your mask, merge group.
Crop your tag and re-size. Add some sparkles!
Add your name and your artist's copyright and you're finished!
28 October 2022

This tutorial was written by me on 28 October 2022. Any similarity to other tutorials is not intentional.
Supplies:
Tube - This gorgeous tube is by Enys Guerrero, you can purchase it at CDO HERE
Scrapkit - I used a stunning kit called Cottage Witch by Irish Princess Designs. You can purchase this kit from Artistic Designz, Mystical Scrap Store, Smiley Shop or Scraps and Company (Not all kits are in her store yet - Store Currently Down).
Be sure to check out Kate's blog HERE.
Mask - I used Tonya's TBT Gothic Mask 6, which you can download HERE
Filters - Xero Porcelain
Font of choice - Agnes Martha
Don't forget to leave some love when you download!
Let's start!
Open a new canvas 800 x 800 and floodfill white.
Copy and paste frame element 4, re-size 80%.
Use your freehand selection tool to draw around your frame. Paste paper 11 as a new layer under the frame layer, selections, invert, delete. Drop Shadow.
Copy and paste your tube, effects xero porcelain, default settings but change the softness to 12. Drop shadow the original layer.
Drop shadow elements as you go, see my tag for placement
Copy and paste element 181, re-size 50. Duplicate, mirror.
Copy and paste element 21, re-size 40%
Copy and paste element 173, re-size 45%.
Copy and paste element 35, re-size 50%
Copy and paste element 8, re-size 40%
Copy and paste element 185, re-size 30%
Copy and paste element 92, re-size 25%
Copy and paste element 1, re-size 40%
Copy and paste element 10, re-size 35%
Copy and paste element 9, re-size 40%
Copy and paste element xx, re-size xx%
Copy and paste element xx, re-size xx%
Create a new raster layer above the background layer. Selections, select all, copy and paste paper 15 into selection, select none. Load your mask, merge group.
Crop your tag and re-size. Add some sparkles!
Add your name and your artist's copyright and you're finished!
25 October 2022
~*~ CT tag for Irish Princess Designs ~*~
This beautiful kit is jam packed with stunning elements and papers for your Halloween tagging! Grab a copy today!
Stores:
Artistic Designz
Mystical
Smiley Shop
Scraps and Company (Not all kits are in her store yet - Store Currently Down)
Fan Group
Blog

This beautiful kit is jam packed with stunning elements and papers for your Halloween tagging! Grab a copy today!
Stores:
Artistic Designz
Mystical
Smiley Shop
Scraps and Company (Not all kits are in her store yet - Store Currently Down)
Fan Group
Blog

19 October 2022
~*~ CT tag for Irish Princess Designs ~*~
This beautiful kit is jam packed with stunning elements and papers for your Halloween tagging! Grab a copy today!
Stores:
Artistic Designz
Mystical
Smiley Shop
Scraps and Company (Not all kits are in her store yet - Store Currently Down)
Fan Group
Blog
This beautiful kit is jam packed with stunning elements and papers for your Halloween tagging! Grab a copy today!
Stores:
Artistic Designz
Mystical
Smiley Shop
Scraps and Company (Not all kits are in her store yet - Store Currently Down)
Fan Group
Blog
17 October 2022

This tutorial was written by me on 17 October 2022. Any similarity to other tutorials is not intentional.
Supplies:
Scrap Kit My Favourite Colour is October by Bella Caribena, purchase via her blog HERE
Mask 170 by Mizteeques HERE
Filters - Xero Porcelain
Font - Unicorns are awesome
Don't forget to leave some love when you download!
Let's start!
Open a new canvas 800 x 800 and floodfill white.
Copy and paste frame element 94.
Click inside each window of your frame with your magic wand, selections, modify, expand by 5. Paste paper 17 as a new layer under the frame layer, selections, invert, delete. Paste your close up tube, delete, select none. Effects xero porcelain, default settings but change the softness to 12. Duplicate the tube, and on the copy, adjust blur, gaussian blur 3. Change the blend mode to soft light. Drop shadow the original layer and change the blend mode to Luminance L. Drop shadow the frame layer.
Drop shadow elements as you go, see my tag for placement
Copy and paste your tube, effects xero porcelain, default settings but change the softness to 12.
Copy and paste element 72, re-size 80%
Copy and paste element 106, re-size 60%
Copy and paste element 18, re-size 40%.
Copy and paste element 71, re-size 70%
Copy and paste element 11, re-size 40%
Copy and paste element 120, re-size 45%
Copy and paste element 6, re-size 20%
Copy and paste element 19, re-size 60%
Copy and paste element 33, re-size 60%
Create a new raster layer above the background layer. Selections, select all, copy and paste paper 10 into selection, select none. Load your mask, merge group.
Crop your tag and re-size. Add some sparkles!
Add your name and your artist's copyright and you're finished!
15 October 2022

This tutorial was written by me on 15 October 2022. Any similarity to other tutorials is not intentional.
Supplies:
Tube - I used a stunning Barbara Jensen tube which you can purchase HERE
Scrapkit - I used a beautiful kit called Answering Him by Wicked Diabla. You can purchase this kit from Wicked Diabla Designs HERE.
Mask - I used Mask_Vivienne_0061, which you can download from Vivienne's Digital Tagging HERE
Filters - Xero Porcelain
Font of choice - Bubble Peanut
Don't forget to leave some love when you download!
Let's start!
Open a new canvas 800 x 800 and floodfill white.
Copy and paste frame element 125.
Click inside your frame with your magic wand, selections, modify, expand by 5. Paste paper 10 as a new layer under the frame layer, selections, invert, delete. Drop shadow the frame layer.
Drop shadwow elements as you go, see my tag for placement
Copy and paste your tube, effects xero porcelain, default settings but change the softness to 12. Duplicate the tube, and on the copy, adjust blur, gaussian blur 3. Change the blend mode to soft light. Drop shadow the original layer.
Copy and paste element 99, re-size 50%
Copy and paste element 109, re-size 50%
Copy and paste element 117, re-size 30%, duplicate and position.
Copy and paste element 116.
Copy and paste element 127.
Copy and paste element 100, re-size 40, duplicate and position.%
Copy and paste element 108, recolour white.
Create a new raster layer above the background layer. Selections, select all, copy and paste paper 2 into selection, select none. Load your mask, merge group. Duplicate, image mirror.
Crop your tag and re-size.
Add your name and your artist's copyright and you're finished!

This tutorial was written by me on 15 October 2022. Any similarity to other tutorials is not intentional.
Supplies:
Tube and Scrapkit - I used a beautiful kit called Pink-O-Ween by Shelley Lynn Designs. This kit includes this awesome tube by Sherri Baldy. Go to Shelley Lynn's blog HERE to find the stores to puchase this kit and tube.
Mask - I used Halloween Mask 4 by Shazzie, which you can download at the Creative Misfits blog HERE
Filters - Xero Porcelain
Font of choice - Alexandra
Don't forget to leave some love when you download!
Let's start!
Open a new canvas 800 x 800 and floodfill white.
Copy and paste frame element 3, re-size75%, drop shadow.
Drop shadwow elements as you go, see my tag for placement
Copy and paste your tube, re-size 65%. Effects xero porcelain, default settings but change the softness to 12. Duplicate the tube, and on the copy, adjust blur, gaussian blur 3. Change the blend mode to soft light. Drop shadow the original layer.
Copy and paste element 41, re-size 50%
Copy and paste element 25, re-size 25%
Copy and paste element 56, re-size x20%.
Copy and paste element 77, re-size 20%
Copy and paste element 29, re-size 80%
Copy and paste element 9, re-size 30%
Copy and paste element 7x, re-size 20%
Create a new raster layer above the background layer. Selections, select all, copy and paste paper 2 into selection, select none. Load your mask, merge group. Lower the opacity to about 44 if you like that look.
Crop your tag and re-size. Add some sparkles!
Add your name and your artist's copyright and you're finished!
Subscribe to:
Comments
(Atom)
Snag My Blinkie

Forum I'm At!!

Blogs I Like


