::I CT For::


::Subscribe To::


::Forum I'm At!!::

Saturday, November 24, 2012

This tutorial was written by me on 24 November 2012. Any similarity to other tutorials is not intentional.
This tutorial was updated on 26 September 2022 to provide more available supplies
Supplies:
Tube of choice - I have used a gorgeous tube by Ismael Rac. Unfortunately he is no longer selling but any winter tube will be great.
Scrapkit - I used a gorgeous kit called Winter Babe which you can download from Tasha's Playground HERE
Filters - Xero Radiance, Eye Candy 4000 gradient glow and Mura Meisters copies
Font of choice, I used Tipsy Giggles which you can download HERE
Mask of Choice. I used Miz Mask 046 which can download HERE
Don't forget to leave some love when you download!
Open a new canvas 800 x 800, floodfill white. We are going to make a frame. Copy and paste star, re-size 50%. Mura Meisters copies, encircle. Change the number to 16. Resize 120%. Click inside the frame with your magic wand, selections, modify, expand by 5. Copy and paste paper 1 as a new layer under your frame layer, selections, invert, delete. Select none. Drop shadow your frame.
Copy and paste your tube as the top layer, this helps when placing your elements.
Copy and paste house, re-size 70%. See my tag for placement of all elements, and drop shadow them as you go.
Copy and paste candy glass, re-size 60%, place on the right side of the tag.
Copy and paste the leaves and place at the bottom of the frame.
Copy and paste a Xmas tree, I used tree 2. Resize 60% and place below the house.
Copy and paste the hat, place under the candy glass
Copy and paste snowman, re-size 50%.
Copy and paste cocoa, re-size 60%
Go back to your tube layer, effects xero radiance, just hit random until you see an effect you like. Duplicate the tube, and on the copy, adjust blur, gaussian blur 4. Change the blend mode to soft light. Drop shadow the original layer.
Crop your tag, re-size and add your artists credits and your name and some sparkles!! You're done!
This is the tag from the original tutorial.

Friday, November 23, 2012

This tutorial was written by me on 23 November 2012 and updated on 27 September 2022. Any similarity to other tutorials is not intentional.
Supplies:
Tube of choice - I have used a gorgeous tube by Eugene Rzhevskii. If you want to use the same tube you can purchase it and a license to use it at PFD HERE
Scrapkit - I used a fantastic kit by Bekki Jane Designs called Tonya's Pink Christmas, thanks so much Bekki! To download this kit visit the Creative Misfits blog HERE
Template - I used template 53 by Horse Play Pastures, thanks Bev! Download it HERE
Mask - I used the ever popular WSL 84, download it HERE
Font - I used MA Sexy
Don't forget to leave some love when you download!
Let's start!!
Open your template and shift d to duplicate it, close the original. Delete the credits, top frame, top frame back, bottom circle frame and bottom circle back layers. Yes I know, that doesn't leave much! It's ok, this will be simple. Image, re-size, change the resolution to 72dpi and the size to 100%. Crop your tag, increase canvas size to 518 by 510. Re-size tag 800 x 788.
Select the background layer and fill white.
On the bottom layer create a new raster layer. Selections select all, float, defloat. Copy and paste paper pattern 3 into selection, select none. Apply your mask. Merge group and resize 105%.
Copy and paste your tube, effects xero radiance, just hit random until you see an effect you like. Duplicate the tube, and on the copy, adjust blur, gaussian blur 4. Change the blend mode to soft light. Drop shadow the original layer.
On the square back layer, selections, select all, float, defloat, copy and past paper4 as a new layer, selections, invert, delete, select none. Delete the original template layer.
On the square frame layer, selections, select all, float, defloat, copy and paste paper pattern 2 as a new layer, selections, invert, delete, select none. Delete the original template layer. Drop shadow.
Drop shadow your elements as you go.
Copy and paste one of the cupcakes, re-size 30%. See my tag for placement of each element.
Drop shadow the dotted lines.
Copy and paste one of the candy canes, re-size 40%. Image rotate Right 20. Duplicate and rotate right 20.
Copy and paste the element 2 re-size 30%. Place above the bottom of the candy canes.
Copy and paste element 18, re-size 30%. Place next to your cupcake.
Copy and paste element 3, re-size 70%
Copy and paste element 25, re-size 70%
Copy and paste element 31, re-size 70%.
Copy and paste element 46 re-size 40%.
Add some sparkles!!!
Add your name, crop and re-size your tag, and add your artist's copyright & you're finished!
This is the original sample tag.

Saturday, October 6, 2012

This tutorial was written by me on 6 October 2012 and updated on 26 September 2022. Any similarity to other tutorials is not intentional.
Supplies:
Tube of choice - I have used a gorgeous Amber tube. If you want to use the same tube you can purchase it and a license to use it at VM Artists HERE
Scrapkit - I used a fantastic kit by Doodle by Design called Deeply Loved, thanks so much hun! You can purchase this kit HERE
Template - I used one by Melissa called MC_Misfit_RectangleTemplate3. This was created for the Creative Misfits blog. You can download it HERE. It's in the post dated 11 March 2012.
Mask - I used the ever popular WSL 84, download it HERE
Font - I used Brush Script MT, which you can download HERE
Don't forget to leave some love when you download!
Let's start!!
Open your template and shift d to duplicate it, close the original. Delete the credits layer (raster 5). Image, re-size, change the resolution to 72 and the size to 100%. Crop your tag and then Image, canvas size 846 x 614.
Create a new raster layer and make it the bottom layer. Fill white.
On raster 1, selections, select all, float/defloat selections modify 3. Create a new raster layer. Copy and paste paper 19 into selection, select none. Delete the original raster 1 layer.
On the bottom merged layer, float/defloat and fill a new raster layer with a colour to suit your tag. Drop shadow. Delete the original template layer.
On the middle merged layer, float/defloat etc and use paper 17.
Float/defloat raster 2, create a new raster layer and fill with a colour or gradient to suit your tag. Copy and paste your tube, selections, invert, delete, select none, Duplicate the tube and mirror then place between the frame. Merge the tubes. Effects, xero, porcelain on default settings but change the softness to 15 and the blue channel to 0. Duplicate the tube and on the top tube adjust blur, gaussian blur 4 and change the blend mode to soft light. Drop shadow the bottom tube and change the blend mode to Luminance legacy.
On the top merged template layer, float/defloat and fill a new raster layer with a colour to suit your tag. Drop shadow and delete the original template layer.
On raster 4 float/defloat, create a new raster layer and fill with a colour or gradient to suit your tag. Copy and paste your tube, selections, invert, delete, select none. Effects, xero, porcelain on default settings but change the softness to 15 and the blue channel to 0. Duplicate the tube and on the top tube adjust blur, gaussian blur 4 and change the blend mode to multiply. Drop shadow the bottom tube and change the blend mode to Soft Light or another blend to suit your tag.
On raster 3 layer, float/defloat and fill a new raster layer with a colour to suit your tag. Drop shadow and delete the original template layer.
Copy and paste element 1, re-size 35% and place at the bottom left of your tag.
Copy and paste element 26, wine glass and re-size 35%, place bottom left of your tag, under the shoe.
Copy and paste element 6, re-size 40% and place at the top left of your tag. Duplicate, image mirror.
Copy and paste element 50, re-size 40% and place at the bottom right of your tag.
Copy and paste element 48, re-size 50% and place under your chocolate box.
Copy and paste your tube, effects xero radiance, just hit random until you see an effect you like. Duplicate the tube, and on the copy, adjust blur, gaussian blur 4. Change the blend mode to soft light. Drop shadow the original layer.
Create a new raster layer above your bottom layer and fill with a paper, colour or gradient. Apply your mask and merge group.
Add some sparkles.
Add your name, crop and re-size your tag, and add your artist's copyright & you're finished!
This was the original sample tag
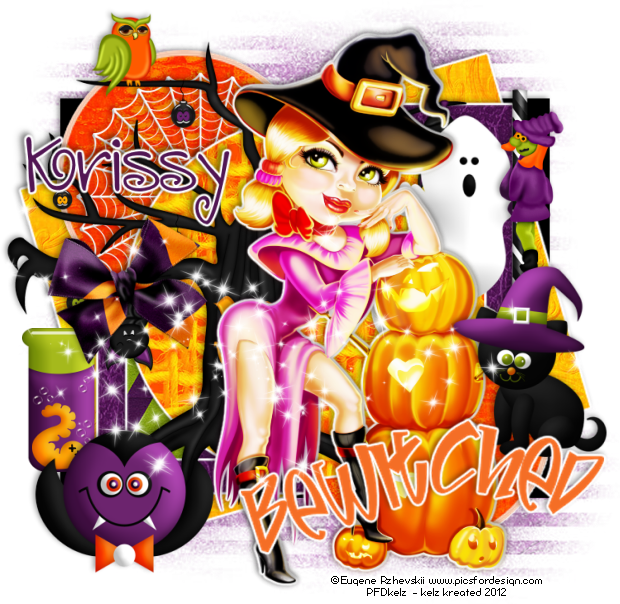
Monday, October 1, 2012

This tutorial was written by me on 30 September 2012 and updated on 27 September 2022. Any similarity to other tutorials is not intentional.
Supplies:
Tube - I have used a witchy tube by Molly Harrison. If you want to use the same tube you can purchase it and a license to use it at CDO HERE
Scrapkit - I used an awesome kit by Crystals Creations called Jeepers Creepers , thanks so much Crystal! You can download this kit HERE
Template - I used template 45 by Tamie, you can download it HERE
Mask - I used WSL 105, download it HERE
Filters - Xero Radiance and Porcelain, Eye Candy 4000 gradient glow
Font of choice, I used Smiley Monster
Don't forget to leave some love when you download!
Let's start!!
Change the resolution of the template to 72 dpi. Increase the canvas size to 800 x 800. Delete the credits layer.
On the Big Circle layer, selections, select all, float/defloat. Create a new raster layer. Copy and paste paper 4 into selection, select none. Delete the original template layer.
Merge the 2 strip layers together then float/defloat. Copy and paste paper 5 as a new layer, select none and delete the original template layer.
Using the same steps as above, repeat using paper 9 on the rectangle layer.
Paper 11 on rectangle 2 and 3.
Paper 6 on the small circle.
Paper 10 on rectangle 4.
Paper 16 on circle,
You can add a gradient glow to each layer if you want, and drop shadow.
Drop shadow each element as you go.
Copy and paste element 18 as a new layer. See my tag for placement.
Copy and paste element 4, re-size 60%
Copy and paste your tube, effects xero radiance, just hit random until you see an effect you like. Duplicate the tube, and on the copy, adjust blur, gaussian blur 4. Change the blend mode to soft light. Drop shadow the original layer.
Copy and paste element 10, re-size 50%
Copy and paste element 13.
Copy and paste element 31 re-size 50%.
Copy and paste element 34 re-size 60% .
Copy and paste element 7 re-size 50%.
Copy and paste element 33 re-size 30%.
Create a new raster layer above the background layer. Selections, select all and fill with a colour from your tube. Select none. Load your mask, merge group. Re-size 110% and lower the opacity to about 60 if necessary.
Add some sparkles!!
Add your name, crop and re-size your tag, and add your artist's copyright & you're finished!
This is the original sample tag.


Sunday, September 30, 2012

This tutorial was written by me on 30 September 2012 and updated on
28 September 2022. Any similarity to other tutorials is not intentional.
Supplies:
Tube of choice - I have used a gorgeous tube by Alex Prihodko. If you want to use the same tube you can purchase it and a license to use it at VM Artists HERE.
Scrapkit - I used a lovely kit by Scraps Dimensions called Autumn Feel. You can download this kit HERE
Mask - I used an RD mask, use one of your choice.
Filters - Xero Radiance, Eye Candy 4000 gradient glow
Font of choice, I used Autumn Chant
Don't forget to leave some love when you download!
Let's start!
Open a new canvas 800 x 800, floodfill white.
Create a new layer above the background layer. Selections, select all. Copy and paste paper 4 into selection, select none. Load your mask and merge group.
Drop shadow each element as you go, see my tag for placement.
Copy and paste elelment 31, the frame and re-size 85%. Using your magic wand, click inside the frame. Selections modify expand by 5. Copy and paste paper 2 as a new layer, selections, invert, delet. Copy and paste your close up tube as a new layer, delete and select none.
On your tube, effects xero radiance, just hit random until you see an effect you like. Duplicate the tube, and on the copy, adjust blur, gaussian blur 4. Change the blend mode to soft light. Drop shadow the original layer.
Copy and paste element 19, the wheelbarrow, and re-size 50%. Position this on the bottom right of your tag.
Copy and paste the flower elements 27 and 28. Re-size 20%
Copy and paste the shrub element 36, re-size 40%.
Copy and paste element 29, the ribbon and re-size 60%.
Copy and paste the butterfly element 32, re-size 20%.
Add some sparkles!
Add your name, crop and re-size your tag, and add your artist's copyright & you're finished!
This is the original sample tag.

Saturday, September 29, 2012

Please click tag to view full size.
This tutorial was written by me on 29 September 2012 and updated on
29 Sseptember 2022. Any similarity to other tutorials is not intentional.
Supplies:
Tube of choice - I have used a very cute Caron Vinson tube which you can purchase at CDOHERE
Scrapkit - I used a gorgeous collab kit by Tamie and Vicki called Trick or Treat, thanks both of you! You can download this kit HERE
Mask - I used Mask_Vivienne_0072, download it HERE
Filters - Xero Radiance
Font of choice, I used We are in Love
Don't forget to leave some love when you download!
Let's start!
Open a new canvas 800 x 800, floodfill white.
Create a new layer above the background layer. Selections, select all. Copy and paste paper 1 into selection, select none. Load your mask and merge group.
Copy and paste TrickorTreatEle27. Click inside with your magic wand, selections, modify, expand by 5. Copy and paste paper 5 as a new layer under the frame layer, selections, invert, delete. Copy and paste your close up above the paper layer, delete. Select none. Lower the opacity on the tube layer to about 38.
Copy and paste the haunted house, element 23 above the mask layer.
Drop shadow each element as you go, and see my tag for placement.
Copy and paste ele13_SV, re-size 80%
Copy and paste ele4_SV re-size 60%
Copy and paste TrickorTreatEle1, re-size 80%. />
Copy and paste TrickorTreatEle12 re-size 60%,
Copy and paste TrickorTreatEle20, re-size 60%
Copy and paste TrickorTreatEle21, re-size 60%. .
Copy and paste ele5_SV, re-size 40%
Copy and paste your tube, effects xero radiance, just hit random until you see an effect you like. Duplicate the tube, and on the copy, adjust blur, gaussian blur 3. Change the blend mode to soft light. Drop shadow the original layer.
Crop your tag, re-size and add some sparkles!!
Add your name and your artist's copyright & you're finished!

This tutorial was written by me on 29 September 2012 and updated on
28 September 2022. Any similarity to other tutorials is not intentional.
Supplies:
Tube of choice - I have used a cheeky witch tube by Eugene Rzhevski. If you want to use the same tube you can purchase it and a license to use it at HERE.
Scrapkit - I used a gorgeous kit Shelley Lynn Designs called Pink-O-Ween, thanks Shelley Lynn! You can purchase this kit HERE.
Template - I used Template 42 by Tamie at Addictive Pleasures, thanks Tamie! You can download it HERE
Mask - I used Mizteeque Mask 303 which you can download HERE
Filters - Xero Radiance and Eye Candy 4000 gradient glow
Font of choice, I used Jungle Friends
Don't forget to leave some love when you download!
Let's start!
Open your template, shift D to duplicate it and delete the original template. Change the resolution to 72 dpi and re-size 800 x 659. Delete the credits and text layers. Open the bg layer and floodfill white.
Create a new layer above the background layer. Selections, select all. Copy and paste a paper into selection or fill with a colour or grandient, select none. Load your mask and merge group.
On the template layers:
On rectangle 2 layer, merge down (merging the two rectangles). Add a new rastr layer, selections, select all, float, defloat (float/defloat). Copy and paste paper 12 into selection, select none. Back to the rectangle 2 layer, float/defloat, invert, delete on the paper layer, select none. Delete the original template layer. Apply a gradient glow if you want to, and drop shadow.
On rectangle 4 merge down (merging rectangles 3 and 4). Create a new raster layer above this layer. Follow the above steps using paper 5.
Repeat as follows;
Circle layer - paper 15
Strip layer- paper 14
Rectangle 5 - paper 2
On Strip 2 layer, float/defloat, new raster layer, fill with a gradient of your choice.
Layers 3 and 4 - paper 9
Layer 1 - paper 4
See my tag for placement of elements, drop shadow as you go.
Copy and paste element 49 the Hocus Pocus mug. Re-size 35% and move to the left side of your tag.
Copy and paste element 19 re-size 35%. right.
Copy and paste one of the spiderwebs, re-size 40%. Copy and paste one of the spiders, re-size 15%.
Copy and paste your tube, effects xero radiance, just hit random until you see an effect you like. Duplicate the tube, and on the copy, adjust blur, gaussian blur 3. Change the blend mode to soft light. Drop shadow the original layer.
Copy and paste element 25, re-size witch, 30%.
Copy and paste element 27, re-size witch, 28%.
Copy and paste test element 33, re-size 28%.
Copy and paste element 66, re-size 40%>
Copy and paste element 38, re-size 15%.
Add some sparkles here!!
Add your name, crop and re-size your tag, and add your artist's copyright & you're finished!
This is the original sample tag.
Friday, September 28, 2012

This tutorial was written by me on 28 September 2012 and updated on
30 September 2022. Any similarity to other tutorials is not intentional.
Supplies:
Tube of choice - I have used a fabulous tube by irmino. If you want to use the same tube you can purchase it at HERE.
Scrapkit - I used this awesome kit by Crystals Creations called Friendship Love. You can download this kit HERE.
Mask - I used WSL 099, which you can download HERE
Filters - Xero Radiance, Eye Candy 4000 gradient glow
Font of choice, I used 2Peas Short Blonde
Don't forget to leave some love when you download!
Let's start!
Open a new canvas 800 x 800, floodfill white.
Create a new raster layer, selections all and copy paper fl_pp10 into selection. Load your mask, merge group.
Copy and paste fl_ee14, re-size 110%. Copy and paste paper fl_pp1 under the frame layer. Click inside the frame with your magic wand, selections, modify, expand by 5. Selections invert, and delete on the paper layer. Drop shadow the frame.
Drop shadow each element as you go, see my tag for placement.
Copy and paste flower element fl_ee35, re-size 40%
Copy and paste butterfly element fl_ee9, re-size 50%
Copy and paste dice element fl_ee37 re-size 40%.
Copy and paste flower element fl_ee25 re-size 70%
Copy and paste bead string element fl_ee1, re-size 70%
Copy and paste the doggy bear element fl_ee31, re-size 40%, image mirror
Copy and paste gift element fl_ee34, re-size 45%
Copy and paste hearts element fl_ee12, re-size 80%
Copy and paste your tube, effects xero radiance, just hit random until you see an effect you like. Duplicate the tube, and on the copy, adjust blur, gaussian blur 3. Change the blend mode to soft light. Drop shadow the original layer.
Crop your tag and re-size. Add some sparkles and your name and artist's copyright and you're finished!
This is the original sample tag.

Thursday, September 27, 2012

This tutorial was written by me on 27 September 2012 and updated on
30 September 2022. Any similarity to other tutorials is not intentional.
Supplies:
Tube of choice - I have used a gorgeous tube by Eugene Rzhevski. This is an Exclusive tube at PFD HERE.
Scrapkit - I used a fantastic kit by Bella Caribena called Welcome My Pretties, thanks Bella! You can purchase this kit HERE.
Mask - I used WSL 261, which you can download HERE
Filters - Xero Radiance
Font of choice, I used Ghosting
Don't forget to leave some love when you download!
Let's start!
Open a new canvas 800 x 800
Drop shadwow elements as you go, see my tag for placement
Copy and paste the flower element BC-WelcomeMyPretties-El (95)
Copy and paste the haunted castle element BC-WelcomeMyPretties-El (41), re-size 60%.
Copy and paste element BC-WelcomeMyPretties-El (92), re-size 60%
Copy and paste element BC-WelcomeMyPretties-El (23).
Copy and paste element BC-WelcomeMyPretties-El (86), re-size 60%
Copy an paste element BC-WelcomeMyPretties-El (135), re-size 45%
Create a new raster layer above the background layer, selections, select all. Copy and paste paper PP (11) into selection. Load your mask, merge group. Image flip. Lower the opacity to about 44.
Copy and paste your tube, effects xero radiance, just hit random until you see an effect you like. Duplicate the tube, and on the copy, adjust blur, gaussian blur 3. Change the blend mode to soft light. Drop shadow the original layer.
Crop your tag and re-size. Add some sparkles!
Add your name and your artist's copyright and you're finished!
This is the original sample tag.

Wednesday, September 26, 2012

This tutorial was written by me on 26 September 2012 and updated on
30 September 2022. Any similarity to other tutorials is not intentional.
Supplies:
Tube of choice - I have used a stunning tube by Attila. If you want to use the same tube you can purchase it and a license to use it at Elegance Fly HERE .
Scrapkit - I used a gorgeous kit by Wicked Diabla called Selena, thanks Izzy! You can purchase this kit HERE.
Mask - I used WSL 105, which you can download HERE
Filters - Xero Radiance
Font of choice, I used Watermelon Script 2
Don't forget to leave some love when you download!
Let's start!
Open a new canvas 800 x 800, floodfill white
.
Copy and paste frame element 78 as a new layer. Click OUTSIDE the frame with your magic wand, selections, modify, expand by 5. Copy paper 6 as a new layer, delete. Drop shadow the frame layer.
Create a new raster layer above your background layer. Selections, select all. Copy and paste paper 1 into selection, select none. Load your mask and merge group.
Drop shadwow elements as you go, see my tag for placement
Copy and paste lamp element 10, re-size 40%.
Copy and paste element 73, re-size 40%
Copy and paste fan element 13, re-size 40%.
Copy and paste ribbon element 44, re-size 40%.
Copy and paste ghost element 92, re-size 40%.
Copy and paste spider element 85, re-size 15%.
Copy and paste skeleton skull element 25, re-size 25%.
Copy and paste Spooky wordart element 63, re-size 30%
Copy and paste your tube, effects xero porcelain, default settings but lower the softness setting to 9. Duplicate the tube, and on the copy, adjust blur, gaussian blur 3. Change the blend mode to screen and lower the opacity to about 52. Drop shadow the original layer.
Crop your tag and re-size. Add some sparkles!
Add your name and your artist's copyright and you're finished!
This is the original sample tag.

Tuesday, September 25, 2012

This tutorial was written by me on 25 September 2012. Any similarity to other tutorials is not intentional.
Supplies:
Tube of choice. I am using a gorgeous tube by Marika. You can purchase her art and a license to use it at CDO
Scrapkit - I used a mini kit by Scottish Butterfly called black Skull. You can download this kit HERE
Template - I used Template 80 by Blissfully Beth, you can download it HERE
Mask - I used Vix Monday mask 1, which you can download HERE
Filters - Xero Radiance and Porcelain, Eye Candy 4000 gradient glow
Font of choice, I used Hasta La Pasta NF
Don't forget to leave some love when you download!
Let's start!
Open your template, shift D to duplicate and delete the original. Delete the credits layer and the line 3 layer. Close the background layer and crop. Re-size the tag 650 x 476. Increase the canvas size 750 x 576. Open the background layer and floodfill it white. Move the words down.
Line 2 Layer - selections, select all, float, defloat, copy paper 3. Selections, invert, delete, select none. Delete the original template layer. Apply a gradient glow and drop shadow.
Repeat for the other template layers, this is what I used:
Line 1 - paper 1
Circle - paper 5
Circle frame - paper 3
Create a new raster layer above the background layer. Selections, select all, copy paper into selection, select none. Apply your mask and merge group.
Drop shadow each element as you go.
Copy and paste the wire and place towards the bottom of the tag.
Copy and paste element 2, the star swirl. Move to the top right. Duplicate and move to the bottom left.
Copy and paste the yellow and black stars as your top layer.
Copy and paste the bow, re-size 70% and place on the left of your frame.
Copy and paste the flower, re-size 80% and place on the left of the frame. Duplicate and image mirror.
Copy and paste the spiky heart, element 4. Duplicate and place them together at the bottom of your tag.
Add some sparkles.
Copy and paste your tube, effects xero radiance, just hit random until you see an effect you like. Duplicate the tube, and on the copy, adjust blur, gaussian blur 4. Change the blend mode to soft light. Drop shadow the original layer.
Apply a gradient glow to the word art layer.
Add your name, re-size your tag, and add your artist's copyright & you're finished!

This tutorial was written by me on 24 September 2012. Any similarity to other tutorials is not intentional.
Supplies:
Tube of choice. I am using a stunning tube by Celinart which I purchased when she was selling at SATC
Scrapkit - I used a kit by MistyLynn called Emo What. You can purchase this kit HERE
Mask - I used Gemsmask 93, which is no longer available to download, use one you have in your stash!
Filters - Xero Radiance and Porcelain, Eye Candy 4000 gradient glow
Font of choice, I used MA Sexy
Don't forget to leave some love when you download!
Let's start!
Open a new canvas 700 x 700, floodfill white.
Copy and paste frame 2 re-size 80%. Click inside with your magic wand, selections, modify, expand by 5. Copy and paste paper 6 under the frame layer, selections, invert, delete, select none. Drop shadow the frame.
Copy and paste your tube, effects xero radiance, just hit random until you see an effect you like. Duplicate the tube, and on the copy, adjust blur, gaussian blur 4. Change the blend mode to soft light. Drop shadow the original layer.
Copy and paste paper 5 as a new layer above your background layer, load mask. Merge group.
Drop shadow your elements as you go.
Copy and paste feather 1 above your mask layer,and re-size 50%.
Copy and paste skull 2 above your frame layer.
Copy and paste flowers 1, 2 and 3 re-size 25%. Duplicate each flower and arrange around your frame.
Copy and paste skull pocket, re-size 30% and place on the bottom right of your tag.
Copy and paste the clip, re-size 30% and place on the top right of your frame.
Copy and paste the teddy, re-size 30%, and place bottom left of your frame.
Copy and paste the skull, re-size 25% and place in the top left corner of the frame.
Crop your tag and re-size. Add some sparkles!
Add your name and your artist's copyright and you're finished!
Monday, September 24, 2012
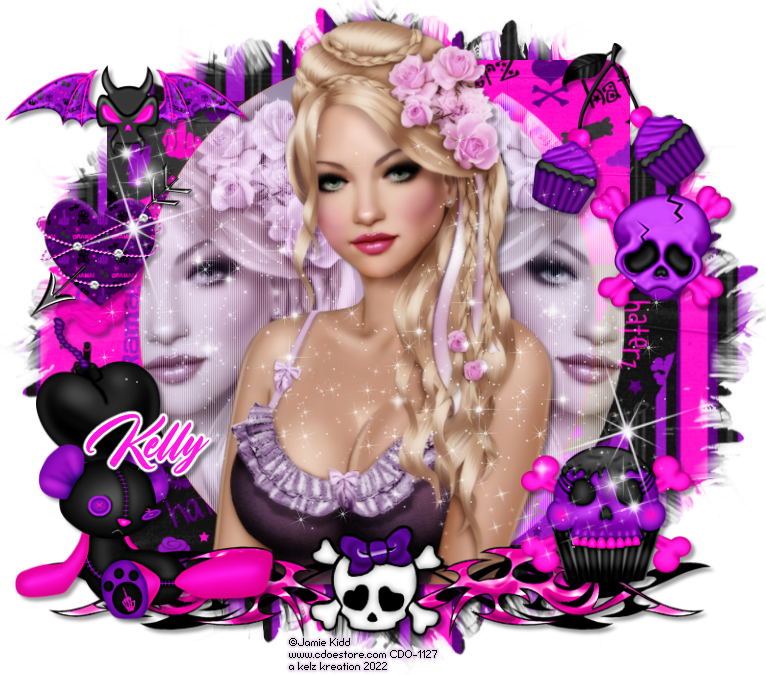
This tutorial was written by me on 24 September 2012 and updated on
5 October 2022. Any similarity to other tutorials is not intentional.
Supplies:
Tube of choice - I am using a gorgeous tube by Jamie Kidd. You can purchase this tube at CDO HERE.
Scrapkit - I am using Krisy's part of a collab called No Drama Haterz she did with Crystal, you can download it at Toxic Desirez HERE
Template - I used Template 865 by Millie's PSP Madness which you can download HERE
Mask - I used a fab mask by sylvie, SC_mask013 which you can download HERE
Filters - Xero Porcelain
Font of choice - Mystic crystal
Don't forget to leave some love when you download!
Let's start!
Open the template, shift D to duplicate and close the original. Image re-size 800 x 707. Delete the credits and wordart layers.
Working from bottom to top layers -
Layer 1 - Selections, select all, float, defloat, copy paper 12 as a new layer, selections invert delete, select none. Delete original template layer.br /> br /> Do the same for each template layer. These are the papers I used.
Layer 2 - Paper 20
Layer 3 - Paper 11
Layer 4 - Paper 9
Layer 5 - Paper 6
Layer 6 - Paper 10
Layer 7 - New raster layer, float defloat, fill with a gradient to suit your tag. Paste your close up tube, invert, delete. Duplicate, mirror, merge down. Effects xero porcelain, default settings but change the softness to 12. Duplicate the tube, and on the copy, adjust blur, gaussian blur 3. Change the blend mode to soft light. Drop shadow the original layer, blend mode to Luminance L.
Drop shadwow elements as you go, see my tag for placement
Copy and paste your main tube, effects xero porcelain, default settings but change the softness to 12. Duplicate the tube, and on the copy, adjust blur, gaussian blur 3. Change the blend mode to soft light. Drop shadow the original layer.
Copy and paste element winged skull, re-size 35%
Copy and paste element cupcake, re-size 30%
Copy and paste element skull 2, re-size 27%
Copy and paste element bomb, re-size 40%
Copy and paste element Teddy, re-size 40%
Copy and paste element Doodle
Copy and paste element cherry cakes, re-size 40%
Copy and paste element barbed heart, re-size 30%
Create a new raster layer above the background layer. Selections, select all, copy and paste paper into selection, select none. Load your mask, merge group. Lower the opacity to about 54.
Crop your tag and re-size. Add some sparkles!
Add your name and your artist's copyright and you're finished!
This is the original sample tag


This tutorial was written by me on 24 September 2012 and updated on
30 September 2022. Any similarity to other tutorials is not intentional.
Supplies:
Tube of choice - I am using a fabulous tube by Nocturne which you can purchase HERE
Scrapkit - I used a stunning kit by ShellyLynn Designs called Rattle My Bones. You can purchase this kit HERE
Mask - I used Trese Mask0008, which you can download HERE
Filters - Xero Radiance and Porcelain, Eye Candy 4000 gradient glow
Font of choice, I used Tabina
Don't forget to leave some love when you download!
Let's start!
Open a new canvas 800 x 800. Copy and paste frame 8. Image rotate, left 90. Image re-size 110%.
Use your magic wand to select inside the frame. Selections, modify, expand by 5. Copy and paste paper 7 as a new layer under your frame layer. Re-size 50%. Adjust the paper to get the look you want. Crop.
Drop shadwow elements as you go, see my tag for placement
Copy and paste pumpkin element 88, re-size 30%.
Copy and paste cupcake element 101, re-size 25%
Copy and paste bottle element 95, re-size 30%
Copy and paste element 17, re-size 30%. .
Copy and paste element 110, re-size 35%. .
Copy and paste element 27, re-size 25% .
Copy and paste bat element 22, re-size 25% .
Copy and paste your tube, effects xero porcelain, default settings but change the softness to 12. Duplicate the tube, and on the copy, adjust blur, gaussian blur 3. Change the blend mode to soft light. Drop shadow the original layer.
New raster layer above your background layer. Selections, select all, copy and paste paper 7 into selection, select none. Load your mask, merge group.
Crop your tag and re-size. Add some sparkles!
Add your name and your artist's copyright and you're finished!
This is the original sample tag


This tutorial was written by me on 24 September 2012 and updated on
30 September 2022. Any similarity to other tutorials is not intentional.
Supplies:
Tube of choice - I am using a stunning tube by Tarya. You can purchase this tube at Elegance Fly HERE.
Scrapkit - This gorgeous kit "Hallows Splendor" is by ShellyLynn Designs, thanks ShellyLynn! You can purchase this kit HERE
Mask - I used Miz_Mask_372, which you can download HERE
Filters - Xero Porcelain,
Font of choice - I used Black Cat
Don't forget to leave some love when you download!
Let's start!
Open a new canvas 800 x 800 and floodfill white.
Copy and paste frame 8 as a new layer, re-size 80%.
New raster layer under frame layer, selections, select all, paste paper 9 into selection, re-size 80%. On the frame layer, click inside the frame with your magic wand, selections modify expand by 5, selections invert delete, select none.
Drop shadwow elements as you go, see my tag for placement
Copy and paste your tube, effects xero porcelain, default settings but change the softness to 12. Duplicate the tube, and on the copy, adjust blur, gaussian blur 3. Change the blend mode to soft light. Drop shadow the original layer.
Copy and paste element 1, re-size 60%
Copy and paste element 88, re-size 70%
Copy and paste element 92, re-size 45%
Copy and paste element 15 re-size 40 %
Create a new raster layer above the background layer. Selections, select all, copy and paste paper8 into selection, select none. Load your mask, merge group. Lower the opacity to about 54.
Crop your tag and re-size. Add some sparkles!
Add your name and your artist's copyright and you're finished!
This is the original sample tag
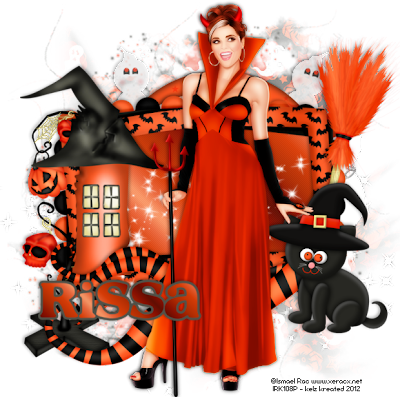
Sunday, September 23, 2012

This tutorial was written by me on 23 September 2012, and edited on 30 September 2022. Any similarity to other tutorials is not intentional.
Supplies:
Tube of choice - I am using a fantastic tube by Alicia Mujica. You can purchase this tube HERE
Scrapkit - This kit "Emo Furry Friends" is by Crystals Creations and it was PTU but is now FTU!! Thanks Crystal! You can download this kit HERE
Filters - Xero Radiance
Font of choice - I used CAC Champagne
Don't forget to leave some love when you download!
Let's start!
Open a new canvas 800 x 800 and floodfill white.
Drop shadwow elements as you go, see my tag for placement
Copy and paste element 36. Duplicate and flip.
Copy and paste element 19, duplicate and mirror.
Copy and paste element 5.
Copy and paste frame element 14 and re-size 125%. Click inside with your magic wand, selections, modify, expand by 5. Copy and paste paper 11 below the frame layer and re-size 70%. Selections, invert delete, select none. Drop shadow the frame layer.
Copy and paste element 12 re-size 60%.
Copy and paste your tube, effects xero radiance, just hit random until you see an effect you like. Duplicate and on the copy, adjust blur, gaussian blur 3. Change the blend mode to soft light or a blend mode to suit your tube. Drop shadow the original layer.
Copy and paste element 17, re-size 75%.
Copy and paste element 18, re-size 55%
Copy and paste element 1, re-size 50%
Copy and paste element 34 re-size 70% and mirror.
Crop your tag and re-size. Add some sparkles!
Add your name and your artist's copyright and you're finished!
This is the original sample tag


This tutorial was written by me on 23 September 2012 and updated on
1 October 2022. Any similarity to other tutorials is not intentional.
Supplies:
Tube of choice - I used an awesome tube by Jamie Kidd which you can purchase at CDO HERE.
Scrapkit - I used a gorgeous kit by Toxic Desirez called Frankie Rawk. You can download it HERE
Filters - Xero Porcelain
Font of choice - CAC Shishoni Scrpit
Don't forget to leave some love when you download!
Let's start!
Open a new canvas 800 x 800 and floodfill white.
Copy and paste frame 2, re-size 90%.
New raster layer under frame layer, selections, select all, paste paper 2 into selection. On the frame layer, click inside the frame with your magic wand, selections modify expand by 5. On the paper layer, selections invert delete, select none.
Drop shadwow elements as you go, see my tag for placement
Copy and paste your tube, effects xero porcelain, default settings but change the softness to 12. Duplicate the tube, and on the copy, adjust blur, gaussian blur 3. Change the blend mode to soft light. Drop shadow the original layer.
Copy and paste element buttons re-size 60%
Copy and paste element teddy re-size 45%
Copy and paste element cuppy re-size 30%
Copy and paste element lips re-size 50%
Copy and paste element skull 3 re-size 30%
Copy and paste element bow 4 re-size 50%
Copy and paste spatter, lower the opacity to about 45. Duplicate image mirror image flip
Crop your tag and re-size. Add some sparkles!
Add your name and your artist's copyright and you're finished!
This is the original sample tag

Saturday, September 22, 2012

This tutorial was written by me on 22 September 2012 and updated on
5 October 2022. Any similarity to other tutorials is not intentional.
Supplies:
Tube of choice - I used a stunning Nocturne tube which is exclusive at Picsfordesign. You can purchase it HERE.
Scrapkit - I used an awesome kit called The Witching Hour which you can purchase at ShelleyLynn Designs HERE
Mask - I used Trese Mask 0492. You can download it HERE
Filters - Xero Porcelain
Font of choice - Hartman and Richard
Don't forget to leave some love when you download!
Let's start!
Open a new canvas 800 x 800 and floodfill white.
Copy and paste frame 8, re-size 70%.
Click inside the frame with your magic wand, selections modify expand by 5, paste paper 5 as a new layer under the frame layer, invert, delete, select none. Drop shadow the frame layer.
Drop shadwow elements as you go, see my tag for placement
Paste your tube, effects xero porcelain, default settings but change the softness to 12. Duplicate the tube, and on the copy, adjust blur, gaussian blur 3. Change the blend mode to soft light. Drop shadow the original layer.
Copy and paste element 40, re-size 10%
Copy and paste element 51, re-size 65%
Copy and paste element 28, re-size 35%
Copy and paste element 32, re-size 30%
Copy and paste element 41, re-size 15%
Copy and paste element 51 again
Copy and paste element 45, re-size 45%
Create a new raster layer above the background layer. Selections, select all, copy and paste paper 10 into selection, select none. Load your mask, merge group. Lower the opacity to about 564.
Crop your tag and re-size. Add some sparkles!
Add your name and your artist's copyright and you're finished!
This is the original sample tag


This tutorial was written by me on 22 September 2012 and updated on
5 October 2022. Any similarity to other tutorials is not intentional.
Supplies:
Tube of choice - I used a gorjuss Suzanne Woolcott tube, unfortunately she is no long selling so choose a suitable tube.
Scrapkit - I used a fantastic kit called Hallows Splendor by ShelleyLynn Designs. You can purchase this kit HERE
Mask - I used Trese Mask 0007, which you can downlaod HERE
Filters - Xero Radiance
Font of choice - Dhestora
Don't forget to leave some love when you download!
Let's start!
Open a new canvas 800 x 800 and floodfill white.
Copy and paste frame 8 re-size 85%.
Click inside the frame with your magic wand, selections modify expand by 5, paste paper 16 as a new layer under the frame layer, delete, select none. Drop shadow the frame layer.
Drop shadwow elements as you go, see my tag for placement
Copy and paste your tube, effects xero radiance, hit random until you find an effect you like. Duplicate the tube, and on the copy, adjust blur, gaussian blur 3. Change the blend mode to soft light. Drop shadow the original layer.
Copy and paste element 103 re-size 45%
Copy and paste element 93, re-size 60%
Copy and paste element 99, re-size 40%
Copy and paste element 58, re-size 30%
Copy and paste element 12, re-size 35%
Copy and paste element 21, re-size 35%
Copy and paste element 88, re-size 30%
Create a new raster layer above the background layer. Selections, select all, copy and paste paper 10 into selection, select none. Load your mask, merge group. Lower the opacity to about 76.
Crop your tag and re-size. Add some sparkles!
Add your name and your artist's copyright and you're finished!
This is the original sample tag


This tutorial was written by me on 22 September 2012 and updated on
1 October 2022. Any similarity to other tutorials is not intentional.
Supplies:
Scrapkit - I used the absolutely stunning kit by Krissy at Toxic Desirez called Vampress, which you can purchase HERE Thank you Krissy!!!
Tube of choice - This Ismael Rac tube is also stunning! It was included in the scrapkit I purchased.
Filters - Xero Porcelain
Font of choice - Yippy Skippy
Don't forget to leave some love when you download!
Let's start!
Open a new canvas 800 x 800 and floodfill white.
Copy and paste cluster frame 2
New raster layer under frame layer, selections, select all, paste paper 11 into selection. On the frame layer, click inside the frame with your magic wand, selections modify expand by 5, selections invert delete, select none. Drop shadow the frame layer.
Drop shadwow elements as you go, see my tag for placement
Copy and paste your tube, effects xero porcelain, default settings but change the softness to 12. Duplicate the tube, and on the copy, adjust blur, gaussian blur 3. Change the blend mode to soft light. Drop shadow the original layer.
Copy and paste element bats 2
Copy and paste element cat re-size 40%
Copy and paste element cat re-size 40%
Copy and paste element cat re-size 40%
Copy and paste element butterfly re-size 40%
Copy and paste element skulls and roses 3 re-size 50%
Copy and paste element Cuppy re-size 30%
Copy and paste element key re-size50 %
Copy and paste element house re-size 50%
Copy and paste element skulls and roses 1 re-size 50%
Crop your tag and re-size. Add some sparkles!
Add your name and your artist's copyright and you're finished!
This is the original sample tag

Friday, September 21, 2012

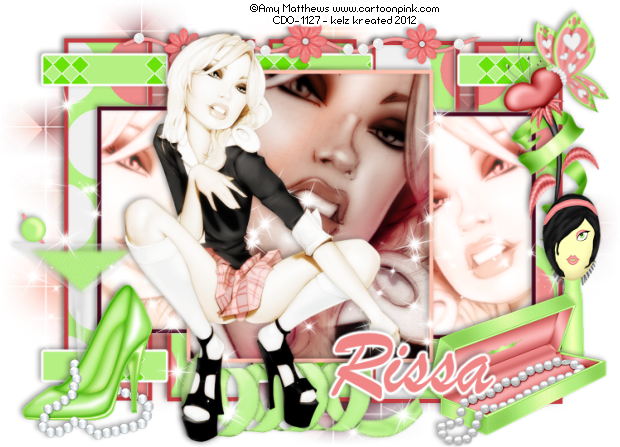
This tutorial was written by me on 21 September 2012. Any similarity to other tutorials is not intentional.
Supplies:
Tube of choice. I am using a gorgeous Amy Matthews tube from CDO. You can purchase this tube and a license to use it at CDO
Scrapkit - I used the stunning kit called Misfit Princess by Rissa's Designs, thanks Rissa! You can download the kit HERE
Template - Just a Little Crush template by Crys, you can download it HERE
Filters - Xero Radiance and Porcelain, Eye Candy 4000 gradient glow
Font of choice, I used Santas Big Secret BB
Don't forget to leave some love when you download!
Let's start!
Open your template, shift D to duplicate it and close the original.
Floodfill the bottom layer with white.
Working from the bottom layer up - on layer 5, selections, select all, float, defloat (float/defloat) copy and paste paper 9. Selections invert delete, select none. Apply a gradient glow and drop shadow.
Repeat on the template layers. I used:
Raster 2 and copy of Raster 2 - Paper 13
Raster 3 - Paper 1
Raster 7 - Paper 14
On Raster 8, add noise - uniform, 35%, monochrome ticked.
Drop shadow each element as you go.
Copy and paste element 72, the lollipops and place it between the top left square and the rectangle layers.
On Raster 4, the large circle, float/defloat, add a new raster layer and floodfill with a gradient to suit your tube. Copy and paste your close up tube a couple of times to fill the circle, selections, invert, delete, select none. Merge the tubes together, delete the original template layer. On your close up tube layer, crop the tag to remove any overhang. Effects Xero porcelain on the default settings but change the softness to 15 and the blue channel to 0. Duplicate the tubes and on the copy, adjust blur, gaussian blur 4. Change the blend mode to screen. On the original, change the blend mode to luminance and drop shadow.
Add the same noise effect to Raster 6 that you used for raster 8 and drop shadow both of these layers.
Copy element 47, the spirally skulls and re-size 70% and paste it over the small front circle.
On both wordart layers, apply a gradient glow and drop shadow.
Copy and paste element 79, the green ribbon, re-size 20% and mirror. Place it at the bottom of the large circle.
Copy and paste element 65, re-size 45%. Duplicate, image mirror. Duplicate again and flip. See my tag for placement.
Copy and paste element 50, the blue skull, re-size 40%
Copy and paste element 27, the shoes, re-size 65%
Copy and paste element 42, the lips button, re-size 70%.
Copy and paste element 52, the Toxic Bitch badge.
Copy and paste element 57, the blue bottle and re-size 35%. Place this under the yellow rose.
Copy and paste element 80, the blue ribbon and re-size 20%.
Re-size your tag and add your main tube. Effects, xero radiance. Hit random until you get something you like.Duplicate the tube layer, and on the copy, adjust blur, gaussian blur 4. Change the blend mode to soft light. Drop shadow the original layer.
Add some sparkles!!
Add your name, and your artist's copyright & you're finished!

This tutorial was written by me on 21 September 2012 and updated on
2 October 2022. Any similarity to other tutorials is not intentional.
Supplies:
Tube of choice - I used a gorgeous kitty tube by Ash Evans which you can purchase at CDO HERE.
Scrapkit - I used the fabulous kit called QTSQ Cybergoth Mask which you can purchase HERE
Filters - Xero Porcelain
Font of choice - Bank Gothic
Don't forget to leave some love when you download!
Let's start!
Open a new canvas 800 x 800 and floodfill white.
Copy and paste frame 3 re-size 70%.
New raster layer under frame layer, selections, select all, paste paper 10 into selection. On the frame layer, click inside the frame with your magic wand, selections modify expand by 12, selections invert delete, select none.
Drop shadow elements as you go, see my tag for placement
Copy and paste your tube, effects xero porcelain, default settings but change the softness to 12. Duplicate the tube, and on the copy, adjust blur, gaussian blur 3. Change the blend mode to soft light. Drop shadow the original layer.
Copy and paste element 31. re-size 80%
Copy and paste element 22, re-size 50%
Copy and paste element 28, re-size 45%
Copy and paste element 67, re-size 50%
Copy and paste element 3, duplicate, mirror, flipbr />
Crop your tag and re-size. Add some sparkles!
Add your name and your artist's copyright and you're finished!
This is the original sample tag


This tutorial was written by me on 20 September 2012 and updated on
1 October 2022 2022. Any similarity to other tutorials is not intentional.
Supplies:
Tube of choice - I used a stunninng tube by Alicia Mujica which you can purchase HERE.
Scrapkit - I used a beautiful kit called Sweet Skull by Irish Princess Designs which you can download HERE, thanks Kate!
Mask - I used Trese Mask0013 which you can download HERE
Filters - Xero Radiance
Font of choice - I used Rainbow Bridge
Don't forget to leave some love when you download!
Let's start!
Open a new canvas 800 x 800 and floodfill white.
Copy and paste frame 22 re-size 110%.
New raster layer under frame layer, selections, select all, paste paper 4 into selection, re-size 70%. On the frame layer, click inside the frame with your magic wand, selections modify expand by 5, selections invert delete, select none.
Drop shadwow elements as you go, see my tag for placement
Copy and paste your tube, effects xero radiance, just click random until you find a look that you like. Duplicate the tube, and on the copy, adjust blur, gaussian blur 3. Change the blend mode to screen and lower the opactity to about 70. Drop shadow the original layer.
Copy and paste element 1
Copy and paste element 2 re-size 80%
Copy and paste element 23 re-size 30%
Copy and paste element 26 re-size 80%
Copy and paste element 5 re-size 50%
Copy and paste element 28 re-size50%
Copy and paste element 19
Create a new raster layer above the background layer. Selections, select all, copy and paste paper 7 into selection, select none. Load your mask, merge group. .
Crop your tag and re-size.
Add your name and your artist's copyright and you're finished!
This is the original sample tag

Wednesday, September 19, 2012

This tutorial was written by me on 19 September 2012 and updated on
1 October 2022. Any similarity to other tutorials is not intentional.
Supplies:
Tube of choice - I used a beautiful Trinita tube which is an Exclusive at Picsfordesign HERE.
Scrapkit - I used a gorgeous kit by Mizteeque called Spring Pickins which you can download HERE
Template - I used Template 209 by Beth, you can download it HERE
Mask - I used WSL mask 83, you can download it HERE
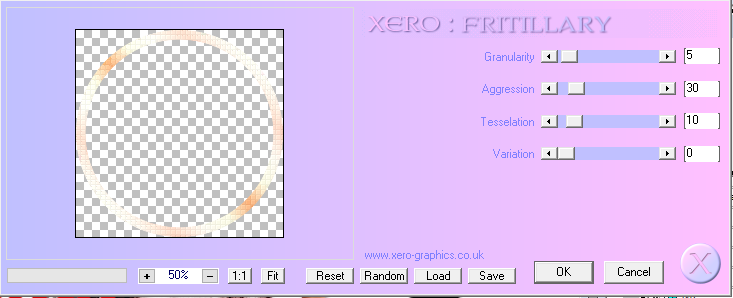
Filters - Xero Radiance and Fritillary, Penta VTR2
Font of choice - I used Rosette
Don't forget to leave some love when you download!
Let's start!
Open the template. Shift D to duplicate the template and delete the original. Delete the credits layer. Crop. Re-size to 700 x 434 pixels then increase canvas size to 800 x 500. New raster layer, fill while. Arrange send to bottom
Copy and paste your tube under the wordart layers, effects xero porcelain, default settings but change the softness to 12. Duplicate the tube, and on the copy, adjust blur, gaussian blur 3. Change the blend mode to soft light. Drop shadow the original layer.
Circle bg layer - new raster layer, selections, select all, paste paper 18 into selection. On circle bg layer, selections, select all, float defloat. On paper layer, selections, invert, delete.
Circle frame layer - float/defloat, new raster layer, fill with a colour or gradient to match your tube. Select none. Xero Fritillary with these settings.
Drop Shadow
Glitter frame layer - Change the colour to suit your tag using Manual Colour Correction. If you haven't used this before, go to Adjust, Colour Balance, Manual Colour Correction. Click on the Source colour and it brings up the dropper, click on the layer in the template then choose your colour the same way by clicking target. Add noise and drop shadow.
Move frame 2 laye above bg1 layer. On bg1 layer merge down (merging bg 1 and 2). Float/defloat, new raster layer, paste paper 1 into selection. Paste your close up into one of the rectangles, selections invert delete. Duplicate tube and mirror, then merge the 2 tube layers. Effects, Penta VTR2. Duplicate and on the copy, adjust blur, gaussian blur 3. Change the blend mode to soft light. On the original, change the blend mode to Luminance L. Drop Shadow
Merge Frame 1 an 2 layers. Float/defloat, new raster layer, fill with the same gradient you used earlier. Select none. Effects, texture blinds changing the colour to white. Drop Shadow
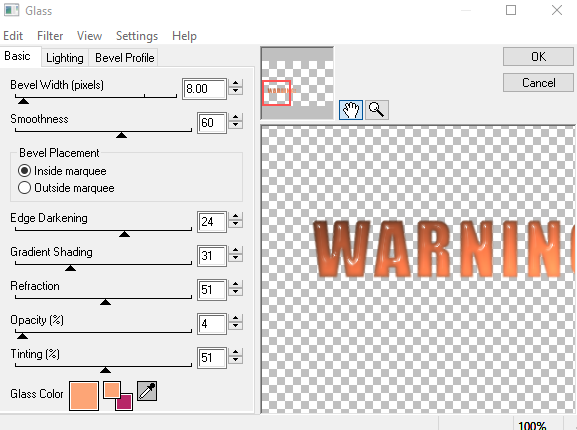
On the 'Warning' text layer, float defloat, new raster layer, fill with a colour to match your tag. Select none. Image rotate, free rotate right 10. Effects, Eye Candy 4000 Glass with these settings
Drop Shadow.
On the wordart layer, re-size 75% and drop shadow. I moved both wordart layers, see my tag.
Drop shadwow elements as you go, see my tag for placement
Copy and paste your tube under the wordart layers, effects xero porcelain, default settings but change the softness to 12. Duplicate the tube, and on the copy, adjust blur, gaussian blur 3. Change the blend mode to soft light. Drop shadow the original layer.
Copy and paste element 15, re-size 30%. Duplicate and mirror.
Copy and paste element 28 re-size 60%. Duplicate and mirror.
Copy and paste element 60 re-size 60%. Duplicate and mirror.
Copy and paste element 54 re-size 35%
Copy and paste element 59 re-size 30%
Copy and paste element 13 re-size 30%. Duplicate, mirror, re-size 60%
Create a new raster layer above the background layer. Selections, select all, copy and paste paper 14 into selection, select none. Load your mask, merge group. Lower the opacity to about 54.
Crop your tag and re-size. Add some sparkles!
Add your name and your artist's copyright and you're finished!
This is the original sample tag

Monday, September 17, 2012
Well, it's time I started looking to be on a couple of CT's so I'm looking around at the moment. If you are looking to expand your CT and you like my work maybe we can work something out? Just putting it out there!!! :)
Tuesday, September 11, 2012

This tutorial was written by me on 11 September 2012. Any similarity to other tutorials is not intentional.
Supplies:
Tube - I am using a gorgeous tube by Elias Chatzoudis. I bought this tube when he was licensed with PTE. If you want to use Elias' art you can purchase at Creative Design Outlet HERE.
Scrapkit - I used a kit called Ice Cream = Happiness. This is Capricious Scraps' part of a January Rain blog train. You can download this part of the train HERE.
Template - I used 'Hide and Seek' by Crys, which you can download HERE.
Filters - Xero Radiance, Eye Candy 4000 gradient glow
Mask - Gemsmask 117 which you can download HERE.
Font of choice, I used Miama.
Let's start!
Open your template. Shift D to duplicate and close the original. Crop your tag and increase the canvas size to 788 x 616. Floodfill raster 1 with white. Delete the word art layers (5, 6 and 7).
It's up to you if you want to keep the dotted lines (the two promoted layers) as you can hardly them in my finished tag! You could keep them and re-colour them if you like.
Just a note about the elements in this kit, she has her credits on most elements so you might want to remove those before copy and pasting onto your tag.
Use papers or gradients to floodfill your template layers (raster 4, copy of raster 4 and raster 3). I used papers 3 and 7. On raster 2, use a gradient. Copy and paste your close up. Effects, xero, porcelain with default settings, but change the softness setting to 15 and the blue channel to 0. Duplicate the tube and on the top copy, adjust blur, gaussian blur. Change the blend mode to screen. Change the bottom to luminence.
Copy and paste ice-cream cart, re-size 45%. Drop shadow (drop shadow all layers)
Copy and paste Sundae, re-size 45%.
Copy and paste one of the flowers, re-size 30%.
Copy and past popsicle, re-size 20%. Use your deform tool to rotate it.
Copy and paste the wordart. Add a fat gradient glow.
Copy and paste one of the ice cream cones, re-size 20%.
Copy and paste the scooper, re-size 15%.
Create a new raster layer above your background layer. Copy and paste a paper and apply mask. Lower opacity to 26 or so depending on which paper you used.
Add some sparkles!!
Add your name, re-size your tag, and add your artist's copyright & you're finished!
Saturday, September 8, 2012

This tutorial was written by me on 8 September 2012 and updated on
1 October 2022 . Any similarity to other tutorials is not intentional.
Supplies:
Tube of choice. I am using a gorgeous tube by Zebrush from PFD. If you would like to use the same tube, you can purchase it at Picsfordesign PFD
Scrapkit - I used a kit called So Angelic which the awesome Kittz made. This kit is no longer available, but you really only need a ribbon and some stars
Mask - I used Becky's mask 042, which is no longer available. Any mask will be fine.
Font of choice, I used Jayne Print YOFF.
Let's start!
Open a new canvas 800 x 800. Floodfill white.
Copy and paste Corner Bow. Duplicate, Image Mirror, Image flip. Merge down. Use your deform tool to stretch out the width a little.
Use your freehand selection tool to draw along the frame. Copy and paste paper 12 as a new layer. Re-size 80%. Selections, invert, delete, select none.
Duplicate your frame. Copy and paste your tube between the two frame layers. On the top frame layer, erase parts of the frame so your tube is half within and
half outside the tube. See my tag if this isn't clear! You'll need to
erase bits of the tube that is outside the frame as well. Crop. Drop shadow the
lower frame layer.
On the tube, effects, xero radiance. Just hit random to get something
you like. Duplicate the tube and on the copy, adjust blur, gaussian
blur 3. Change the blend mode to soft light, and drop shadow on the
original layer.
Copy and paste glass stars above your background layer. Re-size 50%, drop
shadow.
Copy and paste a paper of choice above the background layer and
load mask, merge group.
Crop your tag and re-size. Add some sparkles!
Add your name and your artist's copyright and you're finished!
Wednesday, September 5, 2012

This tutorial was written by me on 5 September 2012 and updated on
1 October 2022. Any similarity to other tutorials is not intentional.
Supplies:
Tube of choice - I used a stunning tube by Chris Pastel. You can purchase the tube at his store HERE.
Scrapkit - I used an awesome PTU kit by Toxic Desirez which you can download HERE
Template - I used AR315_Template54. This awesome template is by Aqua, and you can download it HERE.
Filters - Xero Porcelain
Font of choice - Inspiration
Don't forget to leave some love when you download!
Let's start!
Open template, shift D to Duplicate and delete the original. Delete the credits layer, lower and upper glitter strips and lower pink strip. Close the background layer and crop. Image, canvas size 730 x 566 and under placement, click on the bottom left arrow to allow room for the tube to be placed on the right.
Open the background layer again.
Copy and paste your tube as the top layer. Effects xero porcelain, default settings but change the softness to 12. Duplicate the tube, and on the copy, adjust blur, gaussian blur 3. Change the blend mode to soft light. Drop shadow the original layer.
Now everything is off centre! Crop the tag again, and increase the canvas size to 730 x 600, this time clicking the centre diamond to have everything centred. You might know an easier way to do all this, so do that instead!
Increase the mask layer by about 110%. You can colour it if you like!
Upper glitter circle and lower glitter circle layers - add noise and drop shadow.
Upper Black Circle and Lower black circle layers - Selections, select all, float, defloat, new raster layer, fill with a gradient of your choice. Delete original template layer
Centre Black rectangle - Float/defloat, copy and paste paper 11 as a new layer, selections invert delete, select none. Drop shadow. Delete original template layer.
Copy and paste element frame 1, re-size 50%, drop shadow
Centre glitter rectangle - add noise, drop shadow
Centre pink rectangle - Float/defloat, new raster layer, fill with gradient. Select none, delete original template layer
Black rounded rectange 1 - Drop Shadow
Glitter rounded rectangle - add noise, drop shadow.
Black rounded rectangle 2 - Float/defloat, new raster layer, fill with gradient. Select none, delete original template layer
Pixel text layer - Manual colour correction, change text colour to black
Shape layer - Float/defloat, new raster layer, fill with colour to suit your tag. Paste your close up, selections invert delete, select none, delete original template layer. Effects xero porcelain, default settings but change the softness to 12. Duplicate the tube, and on the copy, adjust blur, gaussian blur 3. Change the blend mode to soft light. Drop shadow the original layer, change the blend mode to Luminance L.
Paste element hat, re-size 50% ,drop shadow.
Change the layer link toggle numbers on the poison, pretty and glitter wordart backing layers and move these layer down a bit.
On the Pretty and glitter wordart backing layers, change the colour to suit your tag, drop shadow the glitter wordart backing layer.
Copy and paste element skull re-size 28%
Crop your tag and re-size. Add some sparkles!
Add your name and your artist's copyright and you're finished!
This is the original sample tag

Subscribe to:
Posts
(Atom)
::Snag My Blinkie::

::Blogs I Like::


