::I CT For::


::Subscribe To::


::Forum I'm At!!::

Friday, December 31, 2010

This tutorial was written by me on 31 December 2010 and updated on 14 October 2022. Any similarity to other tutorials is not intentional.
Supplies:
Tube of Choice. I am using the art of Blonde Blythe, which I purchased from MPT. Choose a suitable tube.
Scrapkit - I used an awesome kit called Pirate Punk by Tammy Kat. You can download it HERE
Filters - Xero Porcelain, Eye Candy 4000 gradient glow
Mask - WSL mask 271 and 307, you can download them HERE.
Font of choice, I used 2Peas DW Sydney.
Let's start!
Open a new canvas 700 x 700, floodfill white.
Copy and paste glitterpaper. Load mask WSL 307. Merge Group
Copy and paste paper 2. Load mask WSL 271. Merge Group, re-size 85%.
Copy and paste your tube. Effects, Xero Porcelain with the default settings but lower the blue channel. Drop Shadow.
Copy and paste glassbrad 2, re-size 70%, drop shadow. Copy and paste pirate punk button, drop shadow. Copy and paste the little heart button. Drop shadow.
Copy and paste one of the flags, re-size 80%. Place above your top mask layer. Drop Shadow.
Copy and paste the pirate map, re-size 80% twice. Using your pick or deform tool, rotate it slightly to the right. Place in between the two mask layers.
Copy and paste the ropebow, re-size 80%. Place near the buttons.
Copy and paste the bottleborder above the top mask layer, re-size 70%. Image mirror & drop shadow.
Add some sparkles!!!
Add your name & copyright & you're finished!
Thursday, December 30, 2010

This tutorial was written by me on 30 December 2010 and updated on
4 October 2022. Any similarity to other tutorials is not intentional.
Supplies:
Tube of choice - I used a gorgeous tube by Verymany which you can purchase at Verymany Tubes HERE.
Scrapkit - I used an awesome kit by Kristen called Angelic, you can download it at Toxic Desierz HERE
Template - I used Missy's template 287 which you can download from Divine Intentionz HERE
Mask - I used WSL344 which you can download from Weescotslass HERE
Filters - Xero Porcelain, Penta VTR2
Font of choice - Magenta Rose
Don't forget to leave some love when you download!
Let's start!
Open your template, shift D to duplicate and close the original. Increase canvas size to 669 x 564. Image re-size 800 x 674. Delete credit layer and small circle layers. Fill background layer white.
Working from bottom to top layers-
Circle 1 - Selections, select all, float, de-float, copy and paste paper 15 as a new layer, selections invert delete, select none. Delet original template layer.
Raster 1 - Float/defloat, paste paper 5 as a new layer, selections, invert delete, select none, delete original template layer.
Rectangle - Float/defloat, paste paper 4 as a new layer, selections, invert delete, select none, delete original template layer.
Circle 2 - Float/defloat, new raster layer, fill with a gradient to suit your tag. Paste your close up as a new layer, selections invert delete. Effects xero porcelain, default settings but change the softness to 12. effects Penta VTR2. Duplicate the tube, and on the copy, adjust blur, gaussian blur 3. Change the blend mode to soft light. Drop shadow the original layer, and change the blend mode to Luminance L.
Frame background - Repeat but mirror your tube.
Frame - add noise, drop shadow.
Merge the gradient, 2 tubes and frame, and move the merged layer to the right of your tag
Copy and paste your main tube, effects xero porcelain, default settings but change the softness to 12. Duplicate the tube, and on the copy, adjust blur, gaussian blur 3. Change the blend mode to soft light. Drop shadow the original layer.
Drop shadwow elements as you go, see my tag for placement
Copy and paste element butterfly 1, re-size 50%
Copy and paste element butterfly 2, re-size 50%
Create a new raster layer above the background layer. Selections, select all, copy and paste paper 16 into selection, select none. Load your mask, merge group. Lower the opacity to about 54.
Crop your tag and re-size. Add some sparkles!
Add your name and your artist's copyright and you're finished!
This is the original sample tag

Monday, December 27, 2010

This tutorial was written by me on 27 December 2010 and updated on
4 October 2022. Any similarity to other tutorials is not intentional.
Supplies:
Tube of choice - I used a stunning tube by Maigan Lynn which you can purchase at CDO HERE.
Scrapkit - I used a beautiful kit called Rainbow Fantasy which you can download at Toxic Desirez HERE
Mask - Trese Mask 0007 which you can download HERE
Filters - Xero Porcelain
Font of choice - Saginaw
Don't forget to leave some love when you download!
Let's start!
Open a new canvas 800 x 800 and floodfill white.
Copy and paste frame 2.
On the frame layer, click inside the frame with your magic wand, selections modify expand by 5, paste paper 15, selections invert delete, select none. Drop shadow the frame layer.
Drop shadwow elements as you go, see my tag for placement
Copy and paste your tube, effects xero porcelain, default settings but change the softness to 12. Duplicate the tube, and on the copy, adjust blur, gaussian blur 3. Change the blend mode to soft light. Drop shadow the original layer.
Copy and paste element unicorn 2, re-size 40%
Copy and paste element starburst, re-size 50%
Copy and paste element cuppy, re-size 25%
Copy and paste element star 3 re-size 45%
Copy and paste element tree
Copy and paste element star border
Create a new raster layer above the background layer. Selections, select all, copy and paste 14 paper into selection, select none. Load your mask, merge group. Lower the opacity to about 26.
Crop your tag and re-size. Add some sparkles!
Add your name and your artist's copyright and you're finished!
This is the original sample tag

Sunday, December 12, 2010


This tutorial was written by me on 12 December 2010 and updated on
29 September 2022. Any similarity to other tutorials is not intentional.
Supplies:
Tube and close up of Choice. I used the art of José Cano which I purchased when he sold at MPT. Choose another tube preferably a laying down one!
Scrapkit - I used an awesome kit called Smitten Kitten by Pink Princess which you can download HERE
Filters - Xero Porcelain, Eye Candy 4000 gradient glow.
Font of choice, I used Whisper
Let's start!
Open a new canvas 600 x 250, floodfill white. Copy and paste a paper of choice, I used a striped one, paper 9. Crop. Adjust blur, gausian blur, 15. Effects, texture, sandstone with these settings
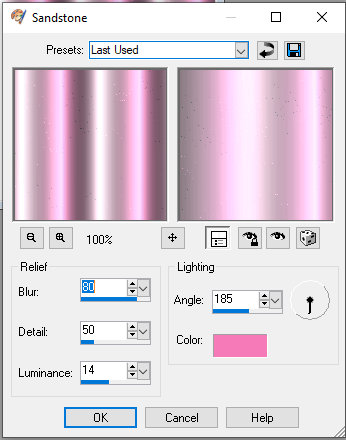
Play around with these settings. I tried this with 3 different papers & got totally different results.
Effects, Xenofex2 Constellation with these settings

Copy and paste your tube as a new layer. Effects, mura meister copies, line, default settings. Lower the opacity to 18 - 30 depending on your tube.
Copy and paste your tube again & move it to the left. Effects, Xero Porcelain at the default settings but lower the blue channel. Drop shadow.
Drop shadow your elements as you go
Copy and paste the cat, re-size 40%
Copy and paste the pawprints, re-size 80%
Copy and paste a dark paper of choice for your border. Crop. Selections, select all, modify by 5, delete.
Layers, new raster layer, floodfill with a contrasting colour. Selections, select all, modify by 1 delete.
Add your name. I used a darker pink gradient glow on mine.
Now, add your artists credits and you are finished!!
For your avatar, hide the border layer, credits and your name, copy merged. Open a new canvas 150 x 150 and paste as a new layer. Image re-size 80%, image mirror. Move it around until you like the bits showing! Crop.
Add the same borders.
Add your name and copyright to AV and you're finished!
Saturday, December 4, 2010

This tutorial was written by me on 4 December 2010 and updated on
4 October 2022. Any similarity to other tutorials is not intentional.
Supplies:
Tube of choice - I used a stunning Christmas tube by Eugene Rzhevskii which you can purchase at Picfordesign HERE.
Scrapkit - I used a kit called Christmas Cheer by the amazing Kittz, which you can download from the Creative Misfits Blog HERE
Mask - WSL mask 246, download from weescotslass HERE
Filters - Xero Radiance, Eye Candy 4000 gradient glow
Font of choice - MA Sexy
Don't forget to leave some love when you download!
Let's start!
Open a new canvas 800 x 800 and floodfill white.
Copy and paste frame 1.
Click outside the frame with your magic wand, selections modify expand by 5, paste paper 16 as a new layer under the frame layer, delete, select none. Drop shadow the frame layer.
Drop shadwow elements as you go, see my tag for placement
Copy and paste your tube, effects xero radiance, hit random until you see an effect you like. Duplicate the tube, and on the copy, adjust blur, gaussian blur 3. Change the blend mode to soft light. Drop shadow the original layer.
Copy and paste element xmas fairy
Copy and paste wordart element re-size 40%, gradient glow and drop shadow
Copy and paste element Ponsettia, re-size 45%
Copy and paste element snowman, re-size 45%
Create a new raster layer above the background layer. Selections, select all, copy and paste paper 2 into selection, select none. Load your mask, merge group. Lower the opacity to about 404.
Crop your tag and re-size. Add some sparkles!
Add your name and your artist's copyright and you're finished!
This is the original sample tag

Saturday, November 20, 2010

This tutorial was written by me on 20 November 2010 and updated on
4 October 2022. Any similarity to other tutorials is not intentional.
Supplies:
Tube and close up of Choice. I am using the awesome art of Arthur Crow. This was a gift in the Christmas 2010 pack from MPT, use another Christmas tube.
Scrapkit - I used an awesome kit by Sarah called Rockin Christmas which is no longer available. Use a kit you have with a frame, Xmas tree, stars and a candy cane
Filters - Xero Radiance, Xenofex 2, Eye Candy 4000 gradient glow.
Mask of choice
Font of choice, I used Carpenter script.
Let's start!
Open a new canvas 700 x 700, floodfill white. Copy and paste a frame, re-size 75%. Using your magic wand, click inside the frame, selections, modify, expand by 5. Copy and paste a paper below your frame layer, selections, invert, delete. Copy and paste your close up tube and place towards the right inside the frame, delete. Duplicate the tube. On the copy, adjust blur, gaussian blur 3, change the blend mode to soft light. On the original, drop shadow, change the blend mode to luminance legacy.
Copy and paste a Christmas tree, drop shadow. Copy and paste star. Duplicate a couple of times & place around your tag.
Copy and paste a star button, duplicate & place on the frame.
Copy and paste a ribbon. Drop Shadow.
Copy and paste a clip. Image mirror, drop shadow. Place this on the top corner of your frame. You might want to rotate it a little.
Create a new raster layer above the background layer. Selections, select all, copy and paste paper into selection, select none. Load your mask, merge group.
Crop your tag and re-size. Add some sparkles!
Add your name and your artist's copyright and you're finished!
Friday, November 19, 2010

This tutorial was written by me on 19 November 2010 and updated on
4 October 2022. Any similarity to other tutorials is not intentional.
Supplies:
Tube of Choice. I am using the awesome art of Ismael Rac.
Scrapkit - I used an awesome kit by Missy called University Xmas, which is no longer available. You can use any kit with a candy cane, snowman, ribbon and other Xmas elements.br>
Filters - Xero Porcelain, Eye Candy 4000 gradient glow.
Font of choice, I used Liquorice.
Let's start!
Open a new canvas 700 x 700, floodfill white. Copy and paste a frame.
Using your magic wand, click inside the frame, selections, modify, expand by 5. Copy and paste a paper. Selections invert, delete. Select none.
Copy and paste a candy cane, mirror, drop shadow. Rotate right 10.
Copy and paste a snowman. Mirror, drop shadow.
Copy and paste a ribbon.
Copy and paste your main tube. Effects, Xero Porcelain on the default settings, but lower the blue channel. Drop shadow, I use Lokas 3d shadow.
Create a new raster layer above the background layer. Selections, select all, copy and paste paper into selection, select none. Load your mask, merge group. Lower the opacity to about 54.
Crop your tag and re-size. Add some sparkles!
Add your name and your artist's copyright and you're finished!
Monday, October 11, 2010

This tutorial was written by me on 11 October 2010 and updated on
30 September 2022 . Any similarity to other tutorials is not intentional.
Supplies:
Tube and close up of choice - I used the awesome art of Stan Dudin. This tube is an Exclusive which is available HERE.
Scrapkit - I used an awesome kit called Emo Glam by Manipulated by Magik which you can download HERE
Mask - I used TBH Hearts mask 4, a lovely mask by Tonya, which you can download at the Creative Misfits blog HERE.
Filters - Xero Porcelain, Lokas Software
Font - I used Daddy Longlegs
Let's start!
Open a new canvas 800 x 800. New raster layer, floodfill white.
Copy and paste frame 4. Using your magic wand, click inside the frame. Selections, modify, expand by 3. New raster layer. Copy and paste paper 15 into selection. Copy and paste your close up, select none. Effects, Xero Porcelain with default settings but change the softness to 12.
Duplicate tube, on the copy, adjust blur, gaussian blur, 3. Change the opacity to screen. On the original, change the opacity to luminance and add a drop shadow.
On your original close up layer, effects texture blinds with these settings

Copy and paste your main tube and place it where it looks best. Apply the Xero Porcelain filter again with the same settings and duplicate your tube. On the copy, adjust blur, gaussian blur, 3. Change the blend mode to soft light. On the orginal tube layer, apply drop shadow. I love Lokas, these are my settings:

Drop shadwow elements as you go, see my tag for placement
Copy and paste emoskull, re-size 60%.
Copy and paste scatter 1. Duplicate, mirror, flip
Copy and paste ribbon 1.
Copy and paste flower vine, image flip.
Copy and paste kitty, re-size 60%
New raster layer above your background layer. Select all paste paper 7 into selection, select none. Load your mask, merge group.
Crop your tag and re-size. Add some sparkles!
Add your name and your artist's copyright and you're finished!
This is the original sample tag

Sunday, September 12, 2010


This tutorial was written by me on 12 September 2010 and updated on
29 September 2022. Any similarity to other tutorials is not intentional.
This is an easy copy and paste tut but I love the effect. It was inspired by a tag my friend Puss Puss made, thanks Puss!!!
Supplies:
Tube - I used the awesome art of Verymany which I purchased HERE
Scrapkit - I used an awesome scrapkit called No Drama Haterz by Krisy at Toxic Desirez, you can download it HERE.
Font : I used New Romantics.
Filters - Xero Porcelain, Eye Candy 4000 Gradient Glow
Let's start!
Drop shadow your elements as you go, see my tag for placement of elements.
Open a new canvas 600 x 250. Copy and paste a paper of your choice.
Copy and paste String and re-size 80%
Copy and paste your tube and move it to the left of the canvas. Duplicate, adjust blur, gaussian blur 3. Change the blend mode to soft light. Apply Xero Porcelain on the original layer, drop shadow the original.
Copy & paste the shoes, resize 25%
Copy & paste a skull, resize 15%. Duplicate a couple of times and arrange how you like.
Copy & paste the Horse, re-size 25%.
Layer, new raster layer. Floodfill with a contrasting colour. Selections, select all, modify, contact by 1, delete. Drop shadow.
To make the Avatar, open a new canvas 150 x 150. Copy and paste your banner, re-size 80%, image mirror. Place where it looks best & crop. Make the same border as you did on your banner.
On both your banner and AV, add some sparkles! Add your name & artist's credits and you're finished!!
This is the original sample banner and AV.


Wednesday, August 25, 2010

This tutorial was written by me on 25 August 2010. Any similarity to other tutorials is not intentional.
Supplies:
Tube of choice. I used the awesome art of Suzanne Woolcott. Unfortunately she is no longer selling her work so choose another tube.
Filters : Mura Meister Copies, L & K's Frederiek, Tramages Metal Peacocks, Fantastic Machines Paint Engine, Xero Porcelain, Xenofex 2 constellation.
Font : I used BeauRivageOneROB
Let's start!
Open a new canvas 600 x 250. Copy and paste your tube. Effects, Mura Meister copies, Wallpaper rotate with these settings:

Effects L & K Friederick, settings:

Effects Tramages Metal Peacocks (I have this filter in my Filters Unlimited folder, it doesn't show in my Tramages folder) these settings:

Effects Fantastic Machines Paint Engine, settings:

Choose your rectangle tool, size 2, foreground White, background Null. Draw a thin rectangle something like this:

Convert to raster. Effects, distortion wave - Horizontal displacement: Amplitute 8, Wavelength 96 Vertical displacement : Amplitute 9, Wavelength 15 Lower the opacity to about 30.
Copy and paste your tube. I like to play around with filters and blend modes to get different effects. This is what I did for this one - Duplicate tube, and on the copy - effects Xero Porcelain, adjust blur, gaussian blur 3, change blend mode to Overlay. Drop shadow the original.
Copy and paste tube again, place on the right side & lower the opacity, I used 60.
Layer, new raster layer, floodfill white. Selections, select all, modify, contract by 2, delete. Select none. Lower opacity to about 80.
Copy merged, we'll make the Avatar now. Open a new canvas 150 x 150. Paste the merged image, re-size 80%, image mirror. Place where it looks best & crop your tag. Do the same border. Add your name or initial and your artist's copyright.
Back to your main tag, add your name & artist's credits and you're finished!!
To animate:
On your background layer - Effects Xenofex 2 Constellation:

Saturday, August 21, 2010


Supplies:
Tube of choice. I used the awesome art of my favourite artist, Ismael Rac. If you want to use the same art you must purchase a license HERE.
Filters : Mura Meister Copies, Unplugged effects, Xero Radiance, Eye Candy 4000
Scrap: Star element of choice or draw your own
Font : I used 2Peas Bleached Blonde
Brush of choice. I used Fairy Dust brushes from Dark Yarrow, you can get them here if you want.
Let's start!
Open a new canvas 600 x 250. Copy and paste your tube as a new layer. Effects, Mura Meister copies Wallpaper Rotate with these settings:

Effects, Unplugged Effects, Tangent Deform with these settings:

Duplicate this layer, Adjust Blur, Gaussian Blur 4. Change the blend mode to soft light. Duplicate twice. The only time I ever name my layers is if I am animating, and I just rename them 1, 2 and 3. This is really only so I can easily see them in my layers!
On my layer 1 - Effects, Distortion Wave with these settings:

Layer 2 - Distortion Wave same settings but change the Wavelength to 25.
Layer 3 - Distortion Wave same settings but change the Wavelength to 15.
Close 2 and 3 for now.
On the original layer (the one you applied the Tangent filter to!), change the blend mode to luminance legacy and lower the opacity to 28.
Make sure you're on the top layer, copy and paste your stars and place off to one side. Drop Shadow.
New raster layer. Apply your brush, I used FF07.
Copy and paste your tube, duplicate, image mirror and place on the left.
On the duplicated tube, lower the opacity to 60-70 and apply a slight drop shadow.
Duplicate your original tube. Adjust blur, gaussian blur 4, change the blend mode to soft light. On the original, Effects Xero Radiance. Drop Shadow.
Make sure you're on your top layer, and open a new raster layer. Floodfill with a colour to suit your tube. Selections, select all, selections modify contract by 4, delete, select none. Adjust, add remove noise, uniform, 75% monochrome ticked.
Copy merged, we'll make the Avatar now. Open a new canvas 150 x 150
. Paste the merged image, re-size 80%, image mirror. Place where it looks best & crop your tag. Do the same border. Add your name or initial and your artist's copyright.
Back to your main tag.
Add your name and artist's copyright.
Make sure you have 2 of your Distortion Wave layers closed, and you're on your Layer 1. Copy Merged & paste as new animation in animation shop. Close layer 1 and open layer 2, Copy Merged & paste after current frame in animation shop. Close layer 2 and open layer 3, Copy Merged & paste after current frame.
Edit, select all, change frame properties to 60. If you're happy with it, you're finished!! Thank you for trying my tut!!
Here are two more examples I made using this tut.
Wednesday, August 18, 2010

Sunday, August 15, 2010


Please click tag to view full size.
This tutorial was written by me on 15 August 2010 and updated on
29 September 2022. Any similarity to other tutorials is not intentional.
Supplies:
Tube and close up of choice - I used a gorgeous tube by Alec Rud. If you want to use the same tube you can purchase it from PFD HERE
Scrapkit - I used the gorgeous It's Fall Yall by Bella Caribena, which you can purchase HERE. Thanks Bella!
Filters - Fantastic Machines, Penta VTR2
Font - Find Lovers
Let's start!
Open a new canvas 600 x 250. Flood fill your canvas with a gradient to match your tube. Effects, Fantastic Machines, Paint Engine, with these settings:

Copy and paste a frame. Click inside your frame, selections, modify expand by 5, copy & paste paper 9, selections, invert delete. Place your paper layer under the frame layer. Image rotate free rotate left 50 on both the frame and paper layers. Using the layer link toggle, change both these layers to 1 so that they move together.

Move towards the top right of your tag, see mine for placement.
Arrange something like this

Click inside your frame, selections, modify by 5, copy and paste your close up. Selections invert delete. Change the blend mode to Luminance (L). Crop. Effects penta VTR2. Drop shadow tube and frame layers.
Close your background and close up tube layers. Duplicate the paper and frame layers, mirror and flip both layers. Close your original paper and frame layers and merge the copies. Open all your layers and arrange to your liking.
Copy and paste your main tube. Duplicate. On the duplicate, adjust blur, gaussian blur, 3 then change the blend mode to soft light. On the original, effects Xero Porcelain, drop shadow.
New Raster layer, fill with the gradient you used earlier. Selections select all selections modify contract by 5, delete. Select none. Effects Screenworks screen array. Drop shadow.
Copy and paste element 10, re-size 25% place under the frame you created, see my tag for placement.
To make the avatar, open a new canvas 120 x 180. On your banner, copy merge and paste onto your blank AV. Re-size 80%, image mirror. Place where it looks best and crop your tag. New Raster layer, fill with your gradient. Selections select all selections modify contract by 3, delete. Select none. Drop shadow.
Add some sparkles to Banner and AV!!
Add your name and copyright to both tag and Av, and you're finished!
This is the original sample banner and AV.


Here is another sample created by my good friend Beverly, thank you so much!


Saturday, August 7, 2010


Supplies:
Tube of choice. I used the awesome art of Ismael Rac. If you want to use his art you must purchase your own tube HERE
Filters : Filter Factory C, Eye Candy 4000 Font : I used Shark Random Funnyness Let's start! Open a new canvas 600 x 250. Effects Filter Factory C, Interference with these settings:

Colourise to suit your tube.
Copy and paste your tube, position to the left, drop shadow. I use Lokas 3d shadow:

Copy and paste your close up & position to the right. Drop shadow & duplicate. On the original, effects texture effects mosaic antique. Lower the opacity of both close ups to get the desired effect. Mine is 30 for the textured layer & 60 for the tube.
Add a new raster layer & fill with a bold colour to match your tag. Selections, select all, selections modify contract by 5, delete. Selections, invert. Selections, modify, contract by 2, delete. Select none. Effects, distortion, Lens distortion. Select the black bits at the top, bottom and sides with your magic wand & press delete on all layers.
Make sure your border (top) layer is active. Effects, Eye Candy 4000 Glass with these settings:

The green colour is the default for this filter. You could change the colour if you want, I just left it & it didn't spoil the effect!!
Add your name & copyright info. You could add some flowers or other elements if you like. I added a doodle behind the tube layers. Be careful not to have the doodle poking your tube in the nose! To make sure this doesn't happen, just make sure the tube layer is active, and selections, select all, float defloat and hit delete on your doodle layer. Make sure none of the doodle is on the outside of the border - unless you like it that way!
To make your avatar, open a new canvas 150 x 150, On your main tag, close the credit layer and your name layer, copy merged and paste onto the new canvas. Move it around until you like what you see. Crop. I usually mirror the image for a slight variation to the main tag.
Add a new raster layer & fill with a bold colour to match your tag. Selections, select all, selections modify contract by 2, delete. Make sure your border (top) layer is active. Effects, distortion, Lens distortion, same settings as above.
Select the black bits at the top, bottom and sides with your magic wand & press delete on all layers.Effects, Eye Candy 4000 Glass with the same settings used in your main tag. Repeat the glass effect, drop shadow.
Add your name and copyright to tag & av & you're finished!
Subscribe to:
Posts
(Atom)
::Snag My Blinkie::

::Blogs I Like::


