11 October 2010
This tutorial was written by me on 11 October 2010 and updated on
30 September 2022 . Any similarity to other tutorials is not intentional.
Supplies:
Tube and close up of choice - I used the awesome art of Stan Dudin. This tube is an Exclusive which is available HERE.
Scrapkit - I used an awesome kit called Emo Glam by Manipulated by Magik which you can download HERE
Mask - I used TBH Hearts mask 4, a lovely mask by Tonya, which you can download at the Creative Misfits blog HERE.
Filters - Xero Porcelain, Lokas Software
Font - I used Daddy Longlegs
Let's start!
Open a new canvas 800 x 800. New raster layer, floodfill white.
Copy and paste frame 4. Using your magic wand, click inside the frame. Selections, modify, expand by 3. New raster layer. Copy and paste paper 15 into selection. Copy and paste your close up, select none. Effects, Xero Porcelain with default settings but change the softness to 12.
Duplicate tube, on the copy, adjust blur, gaussian blur, 3. Change the opacity to screen. On the original, change the opacity to luminance and add a drop shadow.
On your original close up layer, effects texture blinds with these settings Add a drop shadow to your frame layer.
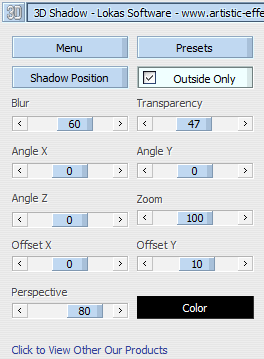
Copy and paste your main tube and place it where it looks best. Apply the Xero Porcelain filter again with the same settings and duplicate your tube. On the copy, adjust blur, gaussian blur, 3. Change the blend mode to soft light. On the orginal tube layer, apply drop shadow. I love Lokas, these are my settings:

Drop shadwow elements as you go, see my tag for placement
Copy and paste emoskull, re-size 60%.
Copy and paste scatter 1. Duplicate, mirror, flip
Copy and paste ribbon 1.
Copy and paste flower vine, image flip.
Copy and paste kitty, re-size 60%
New raster layer above your background layer. Select all paste paper 7 into selection, select none. Load your mask, merge group.
Crop your tag and re-size. Add some sparkles!
Add your name and your artist's copyright and you're finished!
This is the original sample tag
Labels:Tutorials FTU
Subscribe to:
Post Comments
(Atom)
CHAT
Forum I'm At!!

Search This Blog
Categories
Archives
-
►
2025
(49)
- ► 28 Sep - 5 Oct (1)
- ► 21 Sep - 28 Sep (1)
- ► 14 Sep - 21 Sep (1)
- ► 7 Sep - 14 Sep (2)
- ► 31 Aug - 7 Sep (3)
- ► 10 Aug - 17 Aug (1)
- ► 3 Aug - 10 Aug (2)
- ► 27 Jul - 3 Aug (1)
- ► 20 Jul - 27 Jul (2)
- ► 13 Jul - 20 Jul (1)
- ► 6 Jul - 13 Jul (1)
- ► 29 Jun - 6 Jul (2)
- ► 22 Jun - 29 Jun (3)
- ► 15 Jun - 22 Jun (2)
- ► 1 Jun - 8 Jun (3)
- ► 25 May - 1 Jun (1)
- ► 18 May - 25 May (2)
- ► 11 May - 18 May (1)
- ► 4 May - 11 May (1)
- ► 27 Apr - 4 May (1)
- ► 20 Apr - 27 Apr (4)
- ► 13 Apr - 20 Apr (3)
- ► 6 Apr - 13 Apr (6)
- ► 30 Mar - 6 Apr (3)
- ► 16 Mar - 23 Mar (1)
-
►
2024
(1)
- ► 28 Apr - 5 May (1)
-
►
2022
(40)
- ► 4 Dec - 11 Dec (1)
- ► 20 Nov - 27 Nov (2)
- ► 13 Nov - 20 Nov (3)
- ► 6 Nov - 13 Nov (5)
- ► 30 Oct - 6 Nov (5)
- ► 23 Oct - 30 Oct (2)
- ► 16 Oct - 23 Oct (2)
- ► 9 Oct - 16 Oct (10)
- ► 2 Oct - 9 Oct (5)
- ► 25 Sep - 2 Oct (4)
- ► 18 Sep - 25 Sep (1)
-
►
2013
(4)
- ► 2 Jun - 9 Jun (2)
- ► 19 May - 26 May (2)
-
►
2012
(38)
- ► 18 Nov - 25 Nov (2)
- ► 30 Sep - 7 Oct (4)
- ► 23 Sep - 30 Sep (12)
- ► 16 Sep - 23 Sep (8)
- ► 9 Sep - 16 Sep (1)
- ► 2 Sep - 9 Sep (3)
- ► 19 Aug - 26 Aug (1)
- ► 15 Jul - 22 Jul (1)
- ► 3 Jun - 10 Jun (1)
- ► 22 Apr - 29 Apr (2)
- ► 29 Jan - 5 Feb (1)
- ► 22 Jan - 29 Jan (2)
-
►
2011
(9)
- ► 13 Nov - 20 Nov (1)
- ► 3 Jul - 10 Jul (1)
- ► 26 Jun - 3 Jul (1)
- ► 19 Jun - 26 Jun (1)
- ► 12 Jun - 19 Jun (3)
- ► 29 May - 5 Jun (2)
-
▼
2010
(21)
- ► 26 Dec - 2 Jan (3)
- ► 12 Dec - 19 Dec (1)
- ► 28 Nov - 5 Dec (1)
- ► 14 Nov - 21 Nov (2)
- ▼ 10 Oct - 17 Oct (1)
- ► 12 Sep - 19 Sep (1)
- ► 22 Aug - 29 Aug (1)
- ► 15 Aug - 22 Aug (3)
- ► 1 Aug - 8 Aug (2)
- ► 27 Jun - 4 Jul (6)
-
►
2009
(1)
- ► 9 Aug - 16 Aug (1)
Contributors
- Kelly
- Hello and welcome to my blog! I have been in the psp world for over 20 years. I've recently started making AI kits and I'm loving it. I hope you'll find something you like here.


0 comments:
Post a Comment