30 September 2022
This tutorial was written by me on 29 September 2012 and updated on
28 September 2022. Any similarity to other tutorials is not intentional.
Supplies:
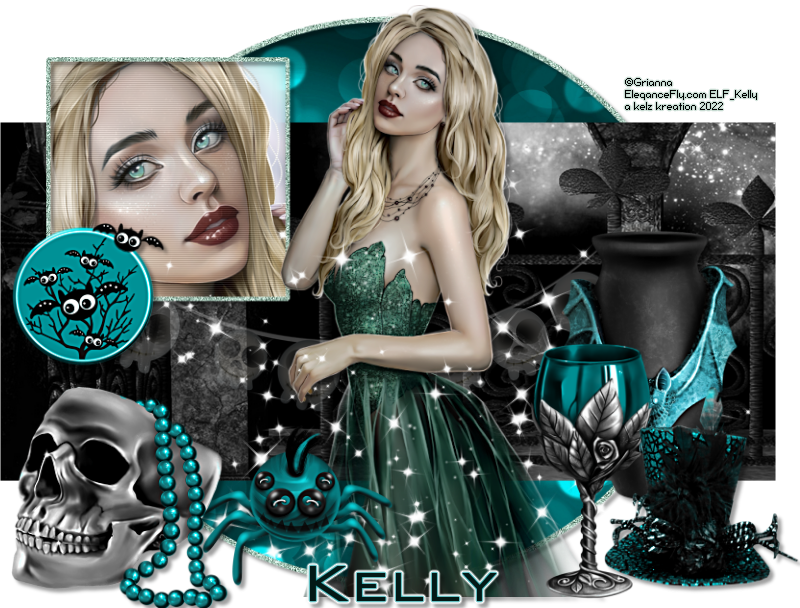
Tube of choice - I have used a gorgeous tube by Grianna which you can purchase at Elegance Fly HERE.
Scrapkit - I used a stunning kit by Wicked Diabla Designs called Selena, thanks Izzy! You can purchase this kit HERE.
Template - I used Template 192 by Punkys Productions, you can download it HERE
Filters - Xero Porcelain, Eye Candy 4000 gradient glow,
Font of choice, I used Bank Gothic
Don't forget to leave some love when you download!
Let's start!
Open your template, shift D to duplicate it and delete the original template. Delete the credits, wordart and hearts layers, bottom square and bottom frame layers. Crop your tag and increase canvas size to 858 x 644. Floodfill the bg layer white.
On the Circle layer, selections select all, float, defloat (float/defloat) copy and paste paper 1 into selection on a new layer. Delete original template layer.
On the circle frame layer, float/defloat and fill with a colour from your tube. Select none. Add some noise if you like. Delete the original template layer. Drop shadow.
On the Black rectangle layer, float/defloat. Copy and paste paper 6 as a new layer, selections invert delete. Delete the original template layer.
On the top square layer, float/defloat, new raster layer, fill with a gradient of your choice. Adjust blur, gausian blur 6. Copy and paste your close up tube, selections invert delete. Delete the original template layer. Effects Penta VTR 2 on default settings.
On the top square frame layer, float/defloat, new raster layer, and fill with the same colour you used earlier. Again, add noise if you want to. Drop shadow.
Merge these 2 layers together.
Drop shadow each element as you go. See my tag for placement.
Copy and paste element 21, re-size 40%
Copy and paste element 98, re-size 40%
Copy and paste element 85, re-size 30%
Copy and paste element 79, re-size 25%
Copy and paste element 72, re-size 30%
Copy and paste element 20, re-size 35%
Copy and paste element 90, lower the opacity to about 26 and lower the layer down until you find a good place for it.
Add some sparkles!
Add your name, crop and re-size your tag, and add your artist's copyright & you're finished!
This is the original sample tag.

28 September 2022
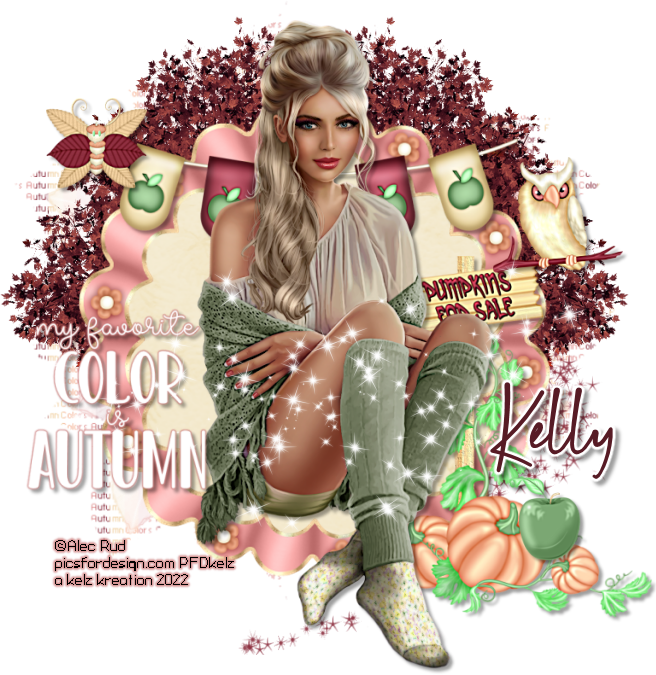
This tutorial was written by me on 28 September 2022. Any similarity to other tutorials is not intentional.
Supplies:
Tube of choice - I am using a lovely tube by Alec Rud. If you want to use the same tube you can purchase it and a license to use it at PFD HERE.
Scrapkit - I used a gorgeous kit by Fab Designz which you can download from the Creative Misfits blog HERE.
Mask and Wordart - I used LeavesMzAne2U mask and wordart by SophisticatSimone, both of which you can download at the Creative Misfits blog HERE
Filters - Xero Porcelain and Eye Candy 4000 gradient glow
Font of choice, I used Big Fish
Don't forget to leave some love when you download!
Let's start!
Open a new canvas 800 x 800.
Copy and paste frame 3, re-size 110%
Click inside the frame with your magic wand, selections modify expand by 10. Paste paper 10 as a new layer, selections invert delete, select none.
Create a new raster layer above your bottom layer and fill with a colour, gradient or paper. I used paper 12. Apply your mask, re-size 90%.
Drop shadow each element as you go, see my tag for placement.
Copy and paste apple banner, re-size75%
Copy and paste fall tree under the frame layer, place it on the left, duplicate mirror.
Copy and paste pumpkin sign, re-size 80%
Copy and paste your tube. Apply Xero Porcelain at the default settings but lower the softness to about 12.
Copy and paste the apple, re-size 25%
Copy and paste the wordart, resize 70%. Selections, select all, float defloat, create a new raster layer under the wordart and fill with white. Selections, invert Delete.
Copy and paste the burgandy sparkle above your mask layer.
Copy and paste the butterfly, re-size 30%
Copy and paste the owl, re-size 30%
Add some sparkles here!!
Add your name, crop and re-size your tag, and add your artist's copyright & you're finished!
27 September 2022


25 September 2022
CT tag for All Dolled up.
I used the awesome kit called Brigit by All Dolled Up. This is a beautiful kit full of strong pink, lack and white elements for you to create with.
You can purchase the kit at Paper Dolls Scrap Store HERE
You can purchase this stunning Alehandra Vanhek tube at VM Artists HERE

I used the awesome kit called Brigit by All Dolled Up. This is a beautiful kit full of strong pink, lack and white elements for you to create with.
You can purchase the kit at Paper Dolls Scrap Store HERE
You can purchase this stunning Alehandra Vanhek tube at VM Artists HERE
Subscribe to:
Comments
(Atom)
Snag My Blinkie

Forum I'm At!!

Blogs I Like


