22 September 2012

This tutorial was written by me on 22 September 2012 and updated on
5 October 2022. Any similarity to other tutorials is not intentional.
Supplies:
Tube of choice - I used a stunning Nocturne tube which is exclusive at Picsfordesign. You can purchase it HERE.
Scrapkit - I used an awesome kit called The Witching Hour which you can purchase at ShelleyLynn Designs HERE
Mask - I used Trese Mask 0492. You can download it HERE
Filters - Xero Porcelain
Font of choice - Hartman and Richard
Don't forget to leave some love when you download!
Let's start!
Open a new canvas 800 x 800 and floodfill white.
Copy and paste frame 8, re-size 70%.
Click inside the frame with your magic wand, selections modify expand by 5, paste paper 5 as a new layer under the frame layer, invert, delete, select none. Drop shadow the frame layer.
Drop shadwow elements as you go, see my tag for placement
Paste your tube, effects xero porcelain, default settings but change the softness to 12. Duplicate the tube, and on the copy, adjust blur, gaussian blur 3. Change the blend mode to soft light. Drop shadow the original layer.
Copy and paste element 40, re-size 10%
Copy and paste element 51, re-size 65%
Copy and paste element 28, re-size 35%
Copy and paste element 32, re-size 30%
Copy and paste element 41, re-size 15%
Copy and paste element 51 again
Copy and paste element 45, re-size 45%
Create a new raster layer above the background layer. Selections, select all, copy and paste paper 10 into selection, select none. Load your mask, merge group. Lower the opacity to about 564.
Crop your tag and re-size. Add some sparkles!
Add your name and your artist's copyright and you're finished!
This is the original sample tag


This tutorial was written by me on 22 September 2012 and updated on
5 October 2022. Any similarity to other tutorials is not intentional.
Supplies:
Tube of choice - I used a gorjuss Suzanne Woolcott tube, unfortunately she is no long selling so choose a suitable tube.
Scrapkit - I used a fantastic kit called Hallows Splendor by ShelleyLynn Designs. You can purchase this kit HERE
Mask - I used Trese Mask 0007, which you can downlaod HERE
Filters - Xero Radiance
Font of choice - Dhestora
Don't forget to leave some love when you download!
Let's start!
Open a new canvas 800 x 800 and floodfill white.
Copy and paste frame 8 re-size 85%.
Click inside the frame with your magic wand, selections modify expand by 5, paste paper 16 as a new layer under the frame layer, delete, select none. Drop shadow the frame layer.
Drop shadwow elements as you go, see my tag for placement
Copy and paste your tube, effects xero radiance, hit random until you find an effect you like. Duplicate the tube, and on the copy, adjust blur, gaussian blur 3. Change the blend mode to soft light. Drop shadow the original layer.
Copy and paste element 103 re-size 45%
Copy and paste element 93, re-size 60%
Copy and paste element 99, re-size 40%
Copy and paste element 58, re-size 30%
Copy and paste element 12, re-size 35%
Copy and paste element 21, re-size 35%
Copy and paste element 88, re-size 30%
Create a new raster layer above the background layer. Selections, select all, copy and paste paper 10 into selection, select none. Load your mask, merge group. Lower the opacity to about 76.
Crop your tag and re-size. Add some sparkles!
Add your name and your artist's copyright and you're finished!
This is the original sample tag


This tutorial was written by me on 22 September 2012 and updated on
1 October 2022. Any similarity to other tutorials is not intentional.
Supplies:
Scrapkit - I used the absolutely stunning kit by Krissy at Toxic Desirez called Vampress, which you can purchase HERE Thank you Krissy!!!
Tube of choice - This Ismael Rac tube is also stunning! It was included in the scrapkit I purchased.
Filters - Xero Porcelain
Font of choice - Yippy Skippy
Don't forget to leave some love when you download!
Let's start!
Open a new canvas 800 x 800 and floodfill white.
Copy and paste cluster frame 2
New raster layer under frame layer, selections, select all, paste paper 11 into selection. On the frame layer, click inside the frame with your magic wand, selections modify expand by 5, selections invert delete, select none. Drop shadow the frame layer.
Drop shadwow elements as you go, see my tag for placement
Copy and paste your tube, effects xero porcelain, default settings but change the softness to 12. Duplicate the tube, and on the copy, adjust blur, gaussian blur 3. Change the blend mode to soft light. Drop shadow the original layer.
Copy and paste element bats 2
Copy and paste element cat re-size 40%
Copy and paste element cat re-size 40%
Copy and paste element cat re-size 40%
Copy and paste element butterfly re-size 40%
Copy and paste element skulls and roses 3 re-size 50%
Copy and paste element Cuppy re-size 30%
Copy and paste element key re-size50 %
Copy and paste element house re-size 50%
Copy and paste element skulls and roses 1 re-size 50%
Crop your tag and re-size. Add some sparkles!
Add your name and your artist's copyright and you're finished!
This is the original sample tag

21 September 2012

This tutorial was written by me on 21 September 2012. Any similarity to other tutorials is not intentional.
Supplies:
Tube of choice. I am using a gorgeous Amy Matthews tube from CDO. You can purchase this tube and a license to use it at CDO
Scrapkit - I used the stunning kit called Misfit Princess by Rissa's Designs, thanks Rissa! You can download the kit HERE
Template - Just a Little Crush template by Crys, you can download it HERE
Filters - Xero Radiance and Porcelain, Eye Candy 4000 gradient glow
Font of choice, I used Santas Big Secret BB
Don't forget to leave some love when you download!
Let's start!
Open your template, shift D to duplicate it and close the original.
Floodfill the bottom layer with white.
Working from the bottom layer up - on layer 5, selections, select all, float, defloat (float/defloat) copy and paste paper 9. Selections invert delete, select none. Apply a gradient glow and drop shadow.
Repeat on the template layers. I used:
Raster 2 and copy of Raster 2 - Paper 13
Raster 3 - Paper 1
Raster 7 - Paper 14
On Raster 8, add noise - uniform, 35%, monochrome ticked.
Drop shadow each element as you go.
Copy and paste element 72, the lollipops and place it between the top left square and the rectangle layers.
On Raster 4, the large circle, float/defloat, add a new raster layer and floodfill with a gradient to suit your tube. Copy and paste your close up tube a couple of times to fill the circle, selections, invert, delete, select none. Merge the tubes together, delete the original template layer. On your close up tube layer, crop the tag to remove any overhang. Effects Xero porcelain on the default settings but change the softness to 15 and the blue channel to 0. Duplicate the tubes and on the copy, adjust blur, gaussian blur 4. Change the blend mode to screen. On the original, change the blend mode to luminance and drop shadow.
Add the same noise effect to Raster 6 that you used for raster 8 and drop shadow both of these layers.
Copy element 47, the spirally skulls and re-size 70% and paste it over the small front circle.
On both wordart layers, apply a gradient glow and drop shadow.
Copy and paste element 79, the green ribbon, re-size 20% and mirror. Place it at the bottom of the large circle.
Copy and paste element 65, re-size 45%. Duplicate, image mirror. Duplicate again and flip. See my tag for placement.
Copy and paste element 50, the blue skull, re-size 40%
Copy and paste element 27, the shoes, re-size 65%
Copy and paste element 42, the lips button, re-size 70%.
Copy and paste element 52, the Toxic Bitch badge.
Copy and paste element 57, the blue bottle and re-size 35%. Place this under the yellow rose.
Copy and paste element 80, the blue ribbon and re-size 20%.
Re-size your tag and add your main tube. Effects, xero radiance. Hit random until you get something you like.Duplicate the tube layer, and on the copy, adjust blur, gaussian blur 4. Change the blend mode to soft light. Drop shadow the original layer.
Add some sparkles!!
Add your name, and your artist's copyright & you're finished!

This tutorial was written by me on 21 September 2012 and updated on
2 October 2022. Any similarity to other tutorials is not intentional.
Supplies:
Tube of choice - I used a gorgeous kitty tube by Ash Evans which you can purchase at CDO HERE.
Scrapkit - I used the fabulous kit called QTSQ Cybergoth Mask which you can purchase HERE
Filters - Xero Porcelain
Font of choice - Bank Gothic
Don't forget to leave some love when you download!
Let's start!
Open a new canvas 800 x 800 and floodfill white.
Copy and paste frame 3 re-size 70%.
New raster layer under frame layer, selections, select all, paste paper 10 into selection. On the frame layer, click inside the frame with your magic wand, selections modify expand by 12, selections invert delete, select none.
Drop shadow elements as you go, see my tag for placement
Copy and paste your tube, effects xero porcelain, default settings but change the softness to 12. Duplicate the tube, and on the copy, adjust blur, gaussian blur 3. Change the blend mode to soft light. Drop shadow the original layer.
Copy and paste element 31. re-size 80%
Copy and paste element 22, re-size 50%
Copy and paste element 28, re-size 45%
Copy and paste element 67, re-size 50%
Copy and paste element 3, duplicate, mirror, flipbr />
Crop your tag and re-size. Add some sparkles!
Add your name and your artist's copyright and you're finished!
This is the original sample tag


This tutorial was written by me on 20 September 2012 and updated on
1 October 2022 2022. Any similarity to other tutorials is not intentional.
Supplies:
Tube of choice - I used a stunninng tube by Alicia Mujica which you can purchase HERE.
Scrapkit - I used a beautiful kit called Sweet Skull by Irish Princess Designs which you can download HERE, thanks Kate!
Mask - I used Trese Mask0013 which you can download HERE
Filters - Xero Radiance
Font of choice - I used Rainbow Bridge
Don't forget to leave some love when you download!
Let's start!
Open a new canvas 800 x 800 and floodfill white.
Copy and paste frame 22 re-size 110%.
New raster layer under frame layer, selections, select all, paste paper 4 into selection, re-size 70%. On the frame layer, click inside the frame with your magic wand, selections modify expand by 5, selections invert delete, select none.
Drop shadwow elements as you go, see my tag for placement
Copy and paste your tube, effects xero radiance, just click random until you find a look that you like. Duplicate the tube, and on the copy, adjust blur, gaussian blur 3. Change the blend mode to screen and lower the opactity to about 70. Drop shadow the original layer.
Copy and paste element 1
Copy and paste element 2 re-size 80%
Copy and paste element 23 re-size 30%
Copy and paste element 26 re-size 80%
Copy and paste element 5 re-size 50%
Copy and paste element 28 re-size50%
Copy and paste element 19
Create a new raster layer above the background layer. Selections, select all, copy and paste paper 7 into selection, select none. Load your mask, merge group. .
Crop your tag and re-size.
Add your name and your artist's copyright and you're finished!
This is the original sample tag

19 September 2012

This tutorial was written by me on 19 September 2012 and updated on
1 October 2022. Any similarity to other tutorials is not intentional.
Supplies:
Tube of choice - I used a beautiful Trinita tube which is an Exclusive at Picsfordesign HERE.
Scrapkit - I used a gorgeous kit by Mizteeque called Spring Pickins which you can download HERE
Template - I used Template 209 by Beth, you can download it HERE
Mask - I used WSL mask 83, you can download it HERE
Filters - Xero Radiance and Fritillary, Penta VTR2
Font of choice - I used Rosette
Don't forget to leave some love when you download!
Let's start!
Open the template. Shift D to duplicate the template and delete the original. Delete the credits layer. Crop. Re-size to 700 x 434 pixels then increase canvas size to 800 x 500. New raster layer, fill while. Arrange send to bottom
Copy and paste your tube under the wordart layers, effects xero porcelain, default settings but change the softness to 12. Duplicate the tube, and on the copy, adjust blur, gaussian blur 3. Change the blend mode to soft light. Drop shadow the original layer.
Circle bg layer - new raster layer, selections, select all, paste paper 18 into selection. On circle bg layer, selections, select all, float defloat. On paper layer, selections, invert, delete.
Circle frame layer - float/defloat, new raster layer, fill with a colour or gradient to match your tube. Select none. Xero Fritillary with these settings.
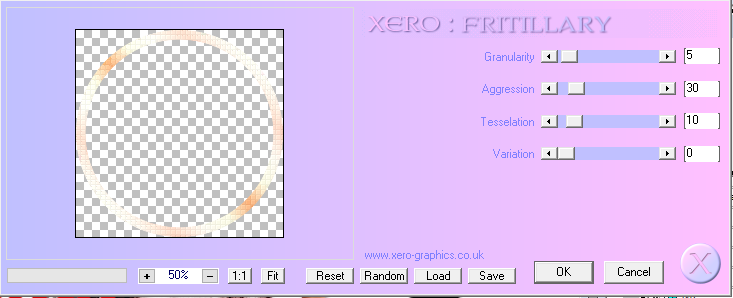
Drop Shadow
Glitter frame layer - Change the colour to suit your tag using Manual Colour Correction. If you haven't used this before, go to Adjust, Colour Balance, Manual Colour Correction. Click on the Source colour and it brings up the dropper, click on the layer in the template then choose your colour the same way by clicking target. Add noise and drop shadow.
Move frame 2 laye above bg1 layer. On bg1 layer merge down (merging bg 1 and 2). Float/defloat, new raster layer, paste paper 1 into selection. Paste your close up into one of the rectangles, selections invert delete. Duplicate tube and mirror, then merge the 2 tube layers. Effects, Penta VTR2. Duplicate and on the copy, adjust blur, gaussian blur 3. Change the blend mode to soft light. On the original, change the blend mode to Luminance L. Drop Shadow
Merge Frame 1 an 2 layers. Float/defloat, new raster layer, fill with the same gradient you used earlier. Select none. Effects, texture blinds changing the colour to white. Drop Shadow
On the 'Warning' text layer, float defloat, new raster layer, fill with a colour to match your tag. Select none. Image rotate, free rotate right 10. Effects, Eye Candy 4000 Glass with these settings
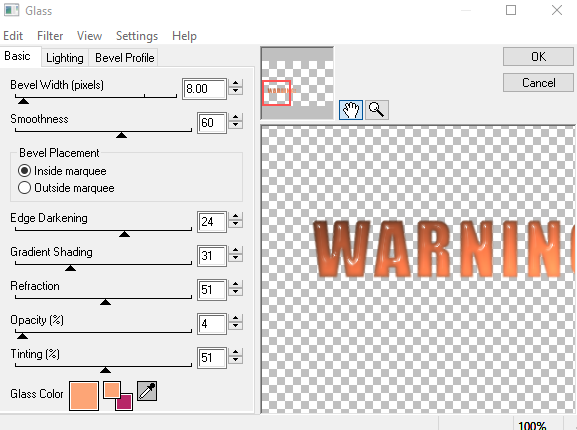
Drop Shadow.
On the wordart layer, re-size 75% and drop shadow. I moved both wordart layers, see my tag.
Drop shadwow elements as you go, see my tag for placement
Copy and paste your tube under the wordart layers, effects xero porcelain, default settings but change the softness to 12. Duplicate the tube, and on the copy, adjust blur, gaussian blur 3. Change the blend mode to soft light. Drop shadow the original layer.
Copy and paste element 15, re-size 30%. Duplicate and mirror.
Copy and paste element 28 re-size 60%. Duplicate and mirror.
Copy and paste element 60 re-size 60%. Duplicate and mirror.
Copy and paste element 54 re-size 35%
Copy and paste element 59 re-size 30%
Copy and paste element 13 re-size 30%. Duplicate, mirror, re-size 60%
Create a new raster layer above the background layer. Selections, select all, copy and paste paper 14 into selection, select none. Load your mask, merge group. Lower the opacity to about 54.
Crop your tag and re-size. Add some sparkles!
Add your name and your artist's copyright and you're finished!
This is the original sample tag

17 September 2012
Well, it's time I started looking to be on a couple of CT's so I'm looking around at the moment. If you are looking to expand your CT and you like my work maybe we can work something out? Just putting it out there!!! :)
Subscribe to:
Comments
(Atom)
Snag My Blinkie

Forum I'm At!!

Blogs I Like


